Tag

desserts

Browsing

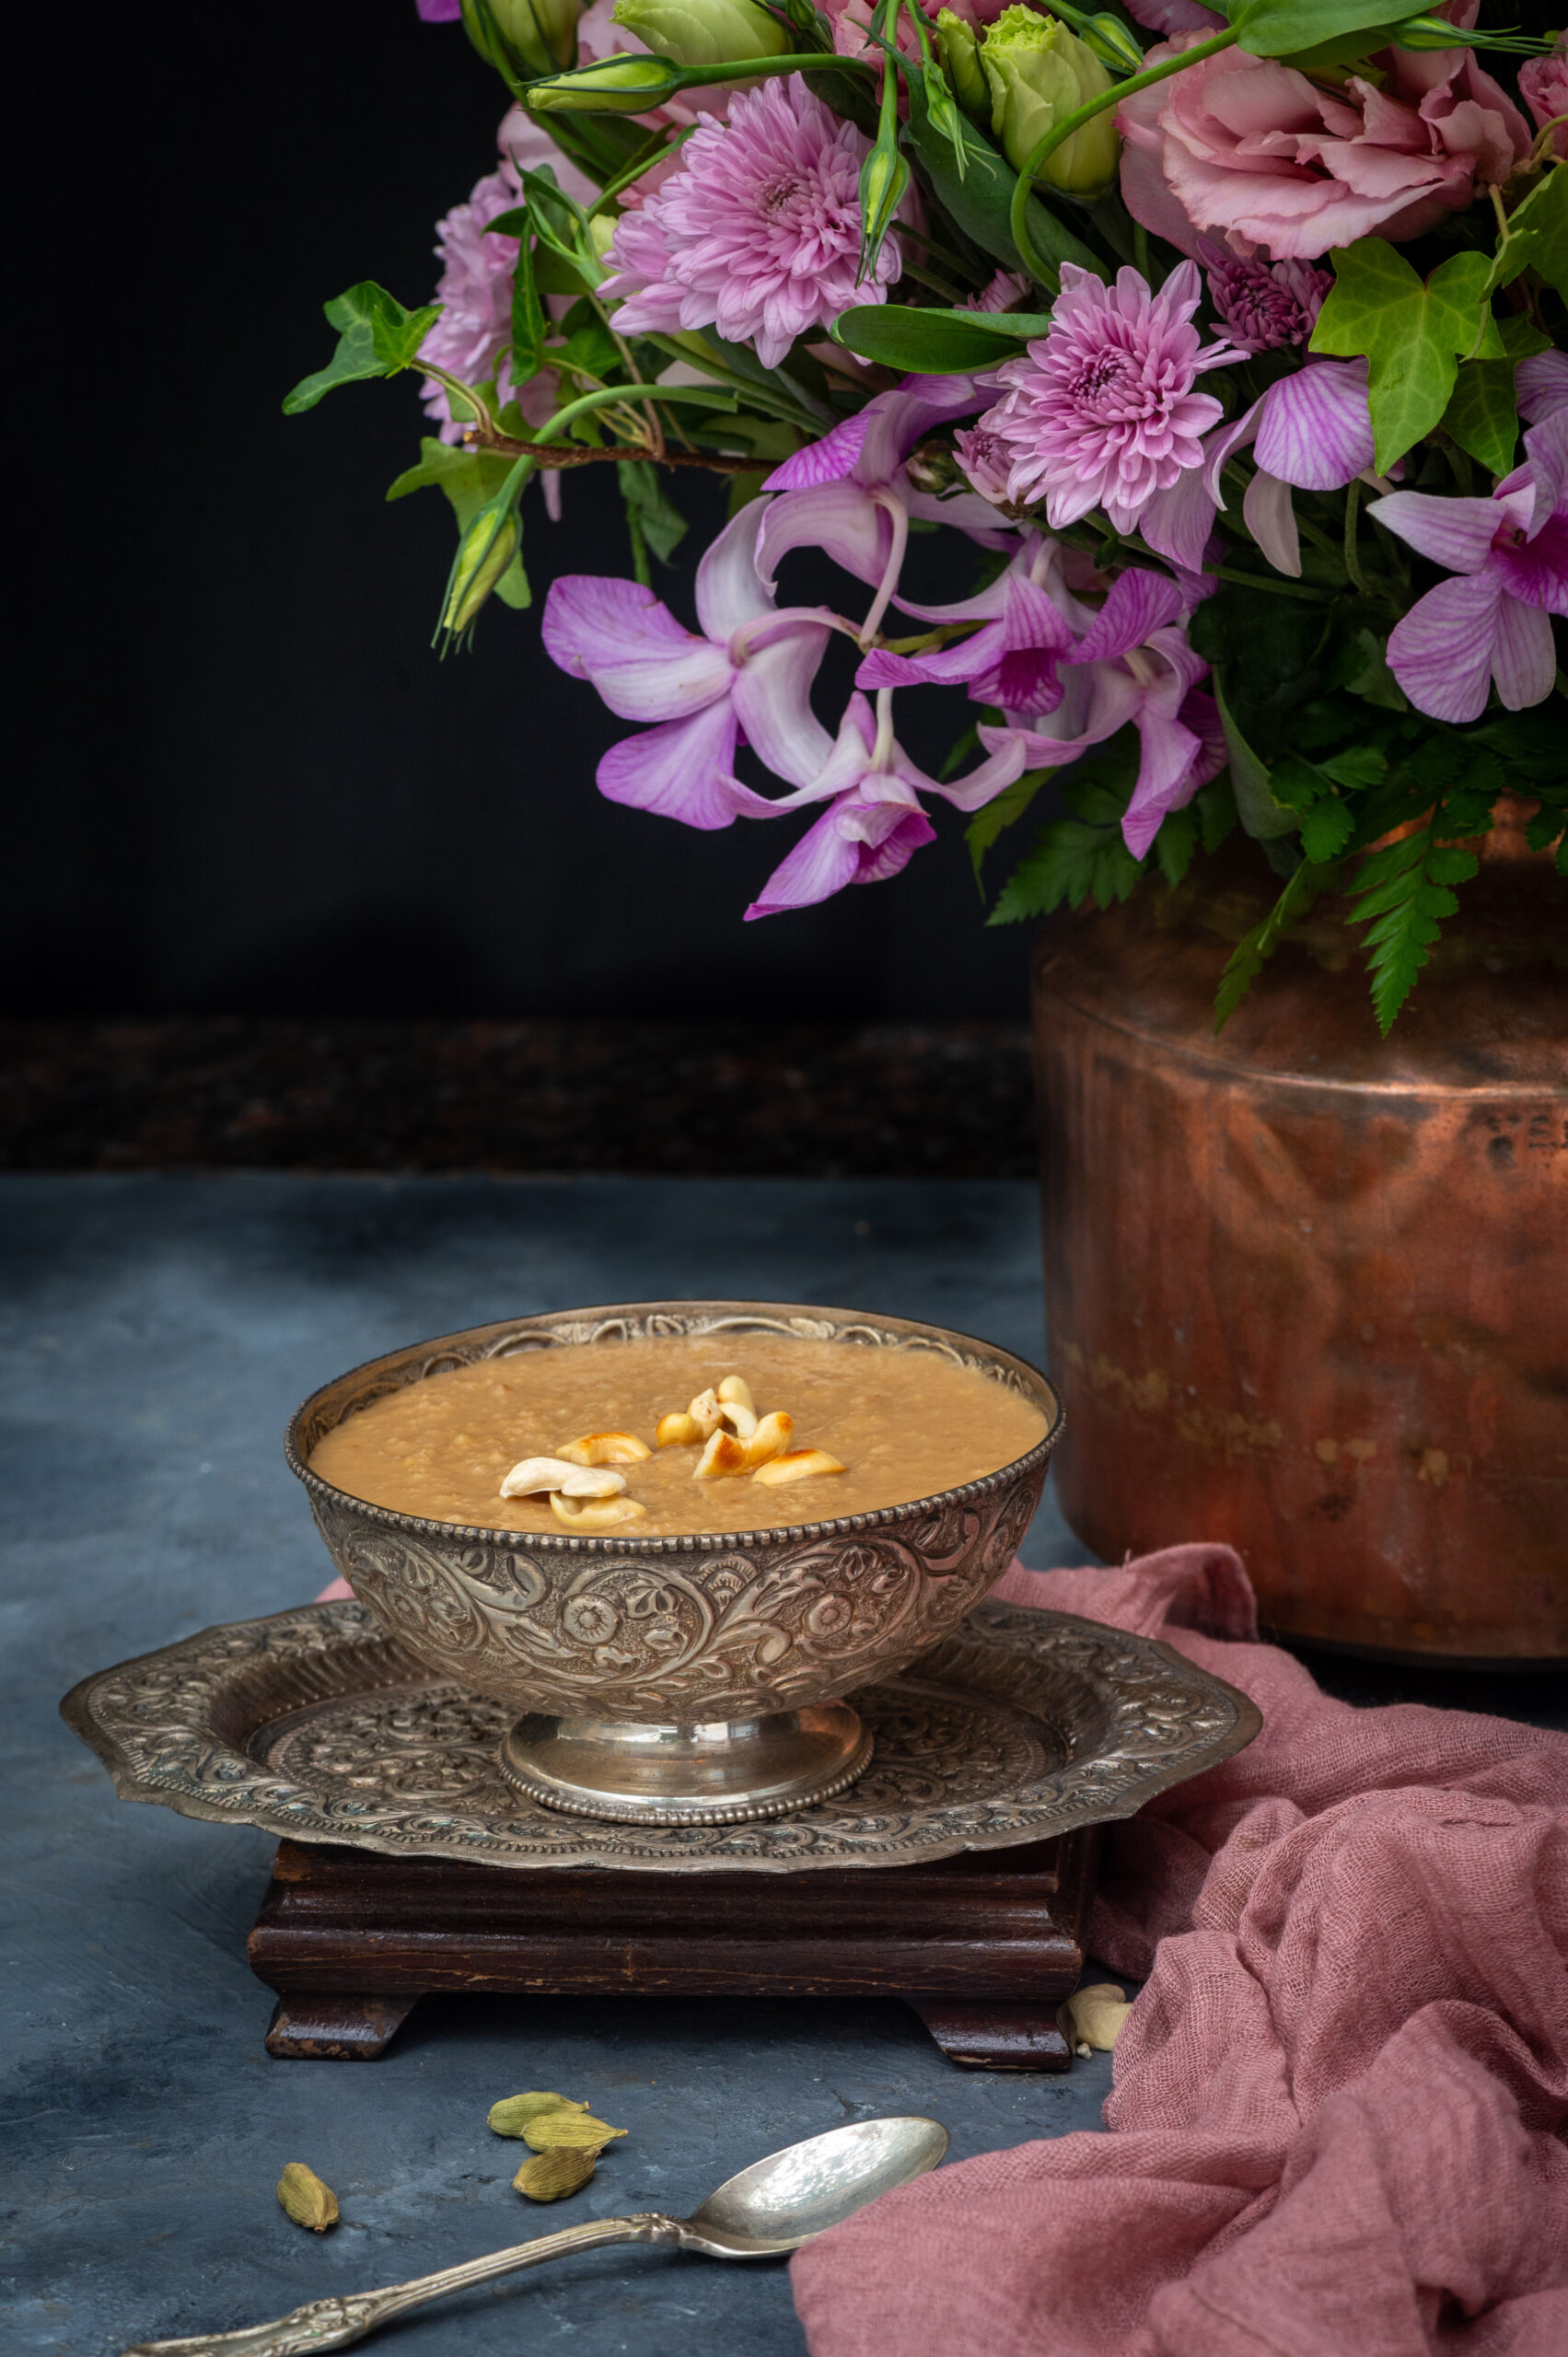
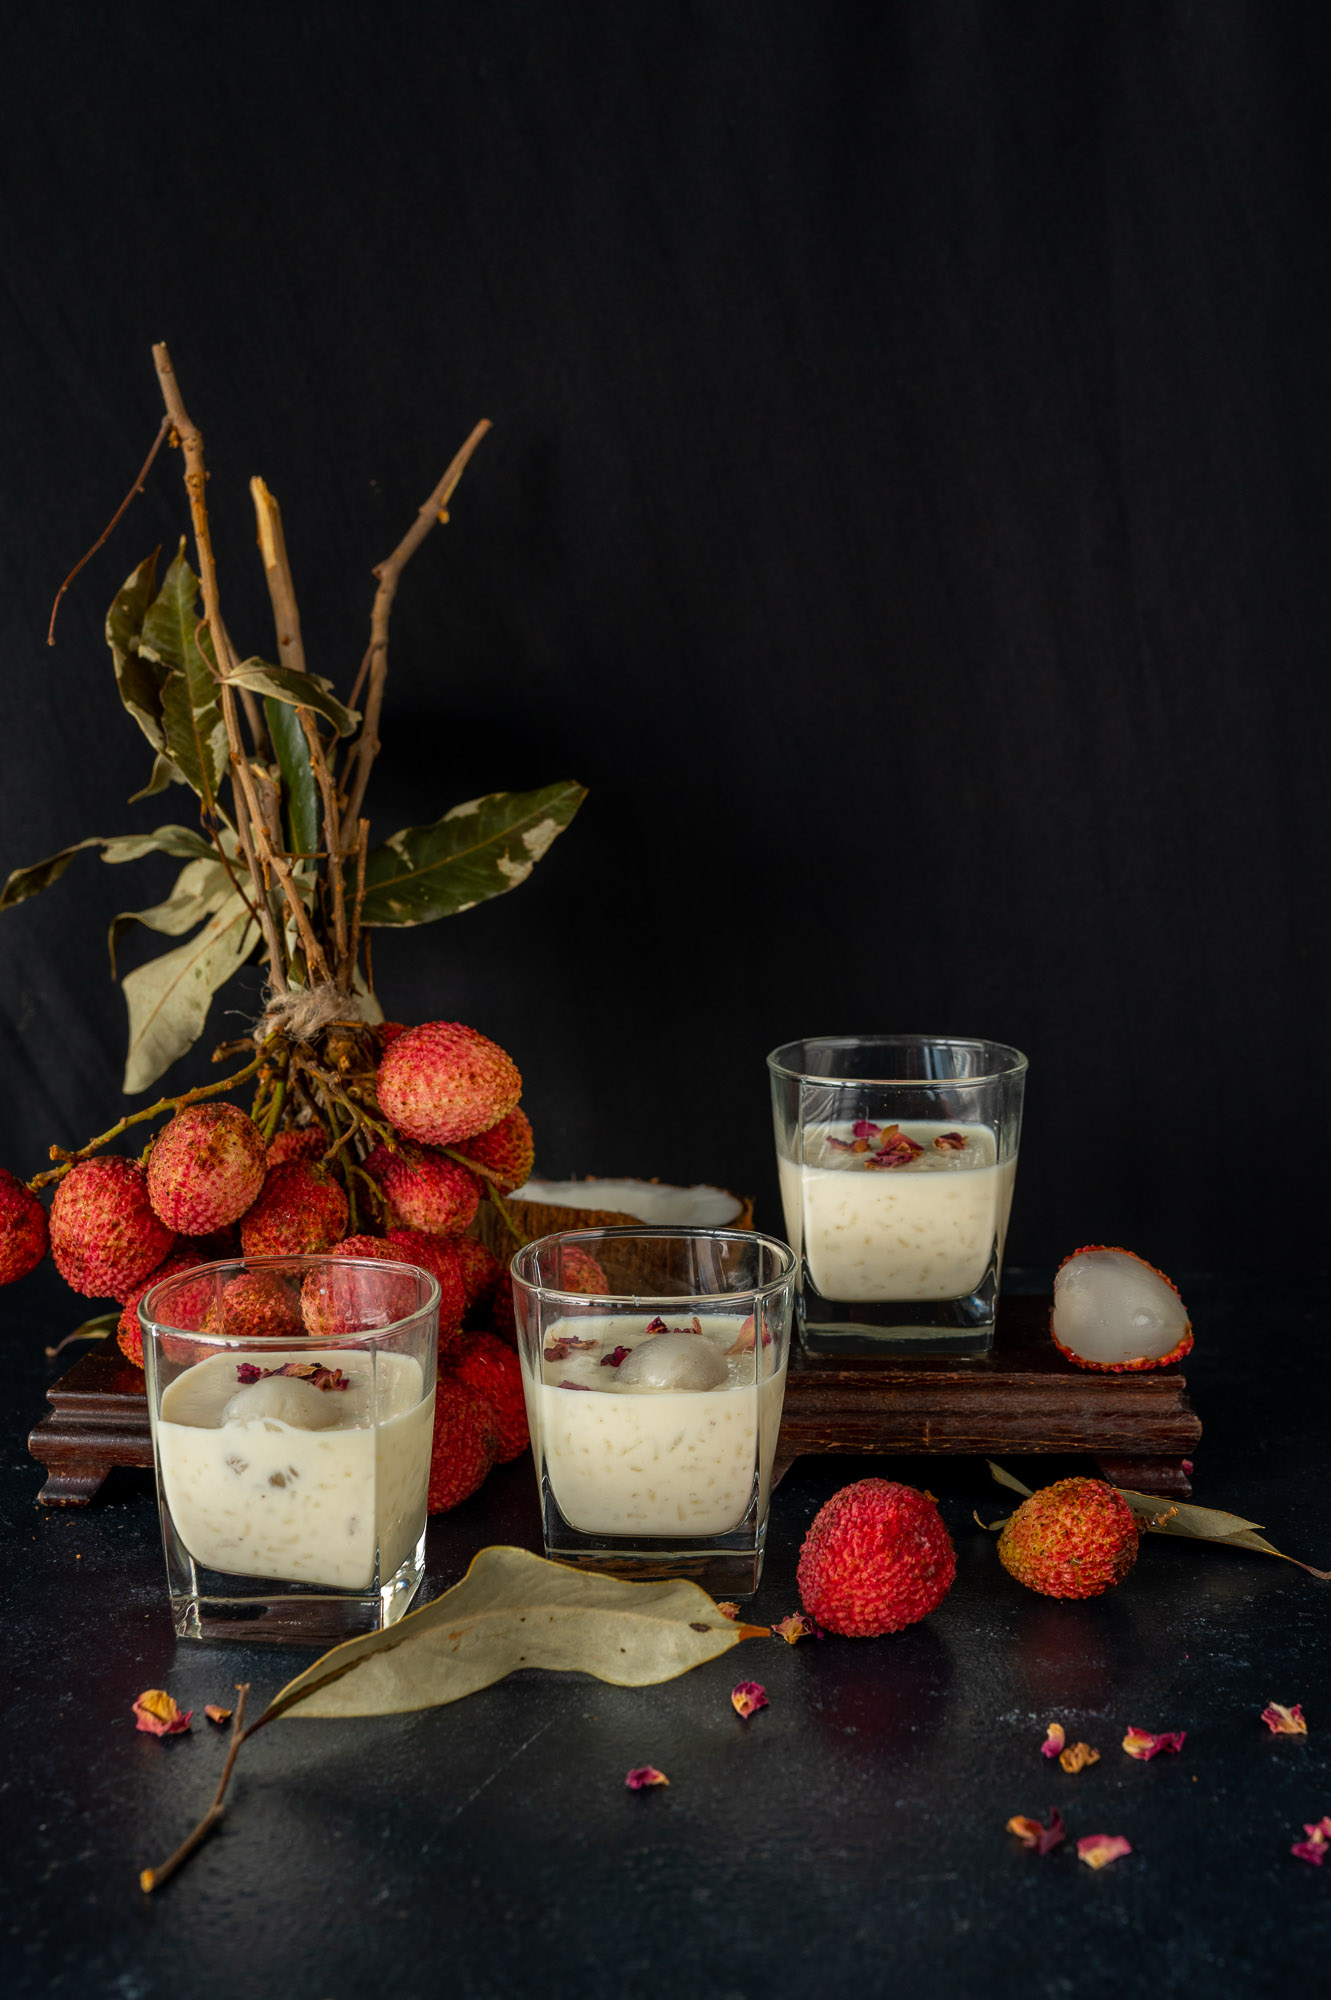
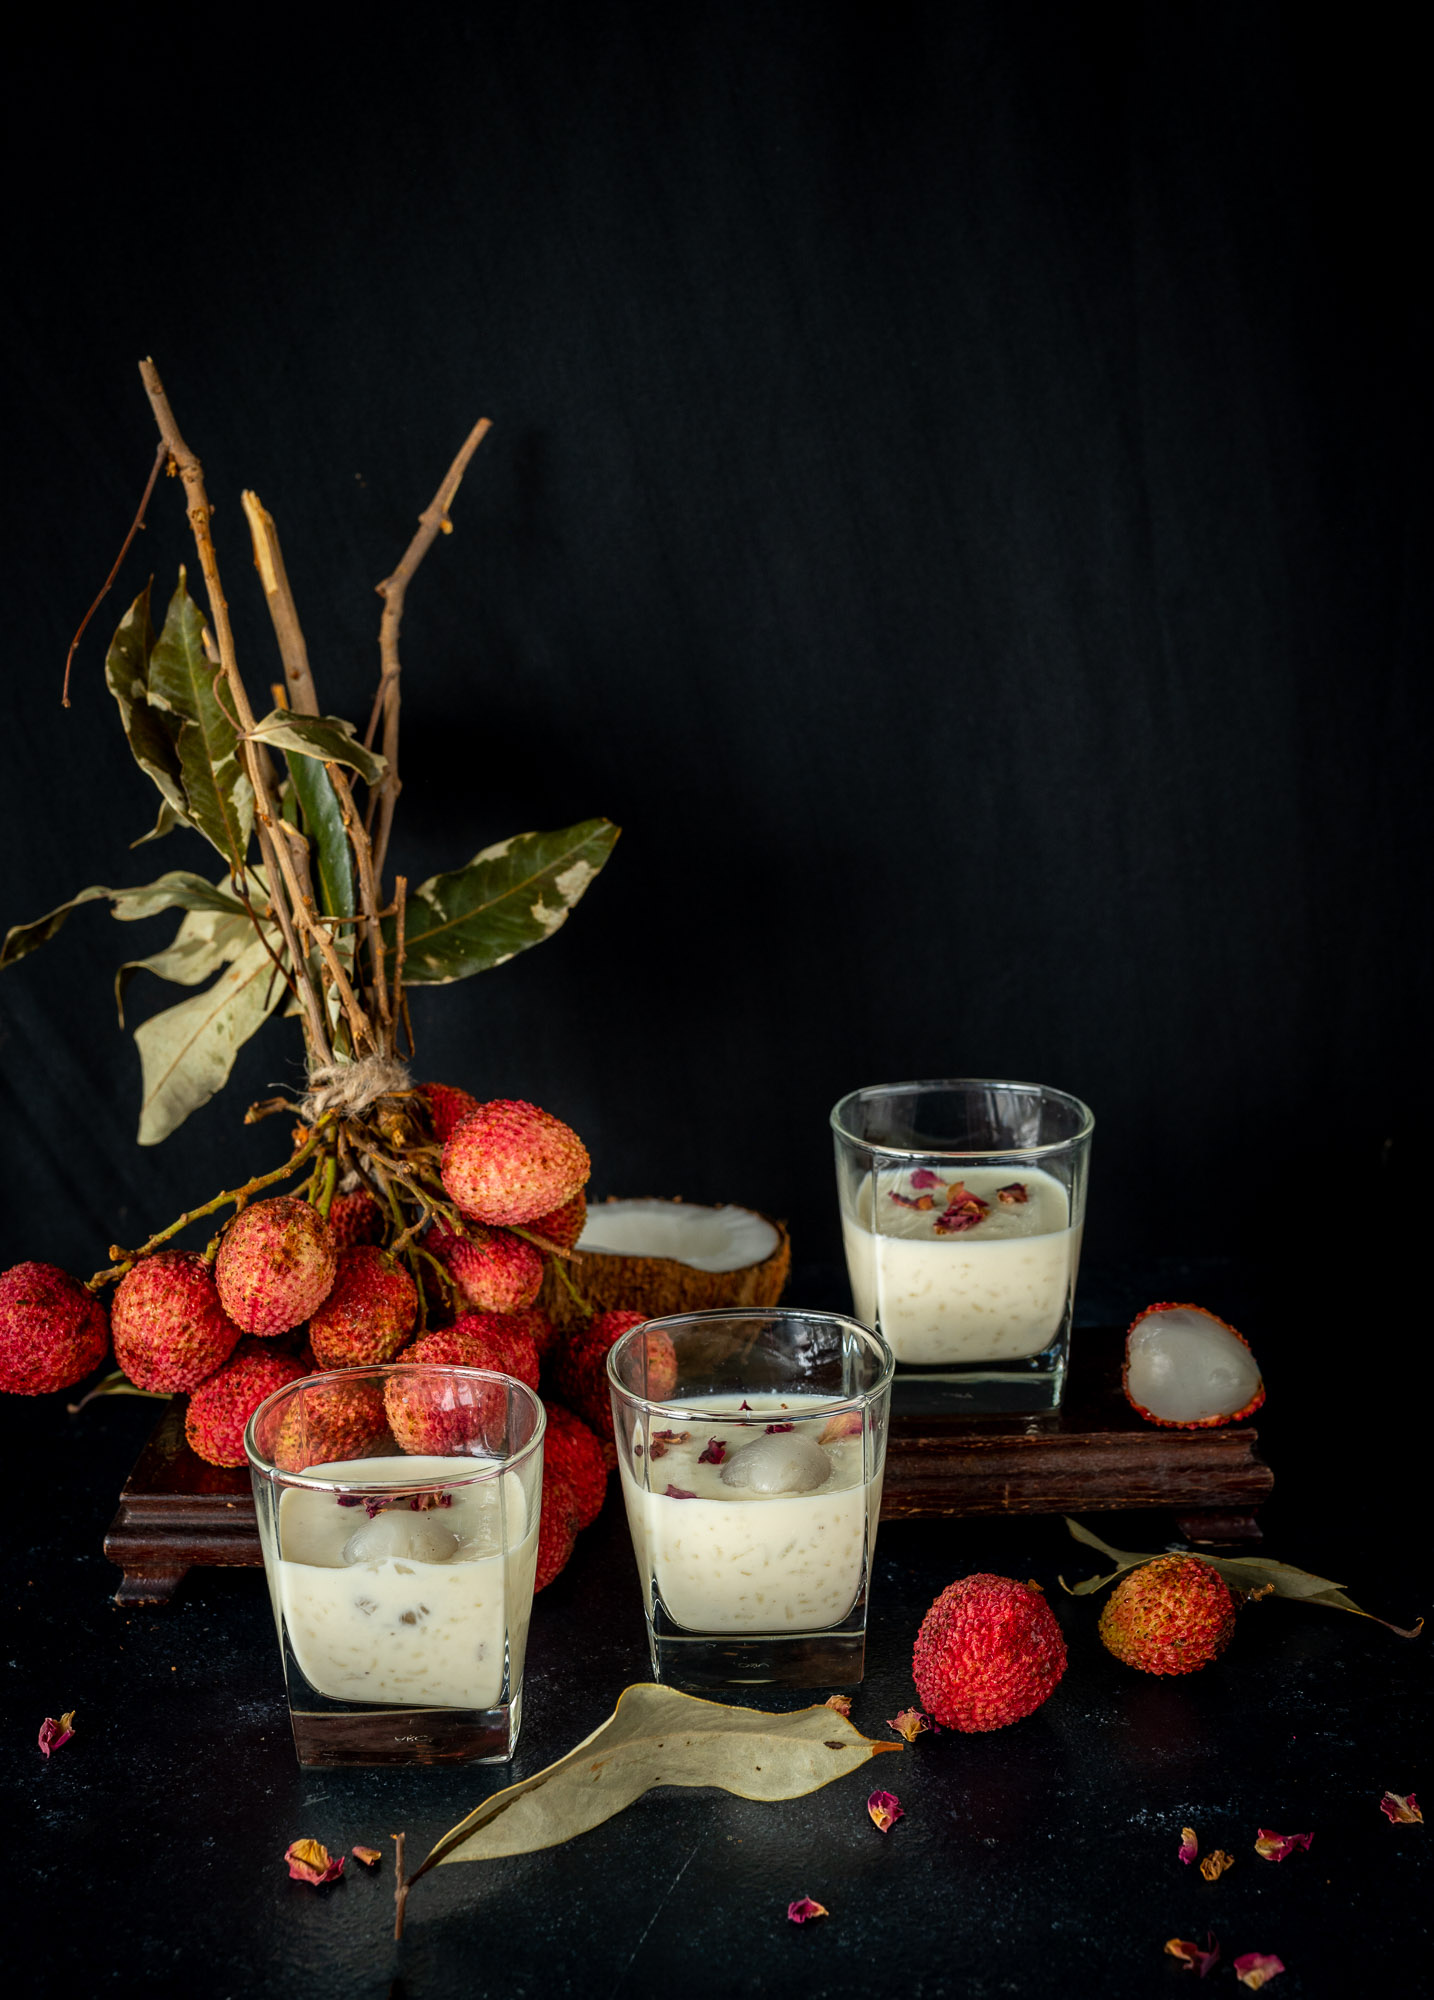
There are numerous milk-based sweets that are very popular in India, and several have made appearances on this blog over the years, as you can see here. While they are all fantastic, for this Deepavali I was thinking about making something that doesn’t require milk. This recipe is great for lactose-intolerant people, and can be tweaked and made vegan (all you have to do is to replace the ghee with your usual alternative). Additionally, the dessert I came up with is millet-based, so it is extra nourishing. Here it is: foxtail payasam.

Foxtail payasam, strictly speaking, is not quite my own recipe, even though I’ve substantially played with the basic ingredients. As a payasam, it can be said to be traditional in South India, where they are a well-known category of dessert, eaten often and not just on festive occasions. Here in Tamil Nadu, foxtail millet is known as thinai and is a widely-known native produce. Like all millets, it is nutritious and versatile.

Many of us have become conscious about our eating choices and have brought millets into our diets over the last few years as a white rice replacement. Even the Tamil Nadu state government has been promoting their use, and so has the United Nations. This is something that I’ve advocated for as well, across many recipes.

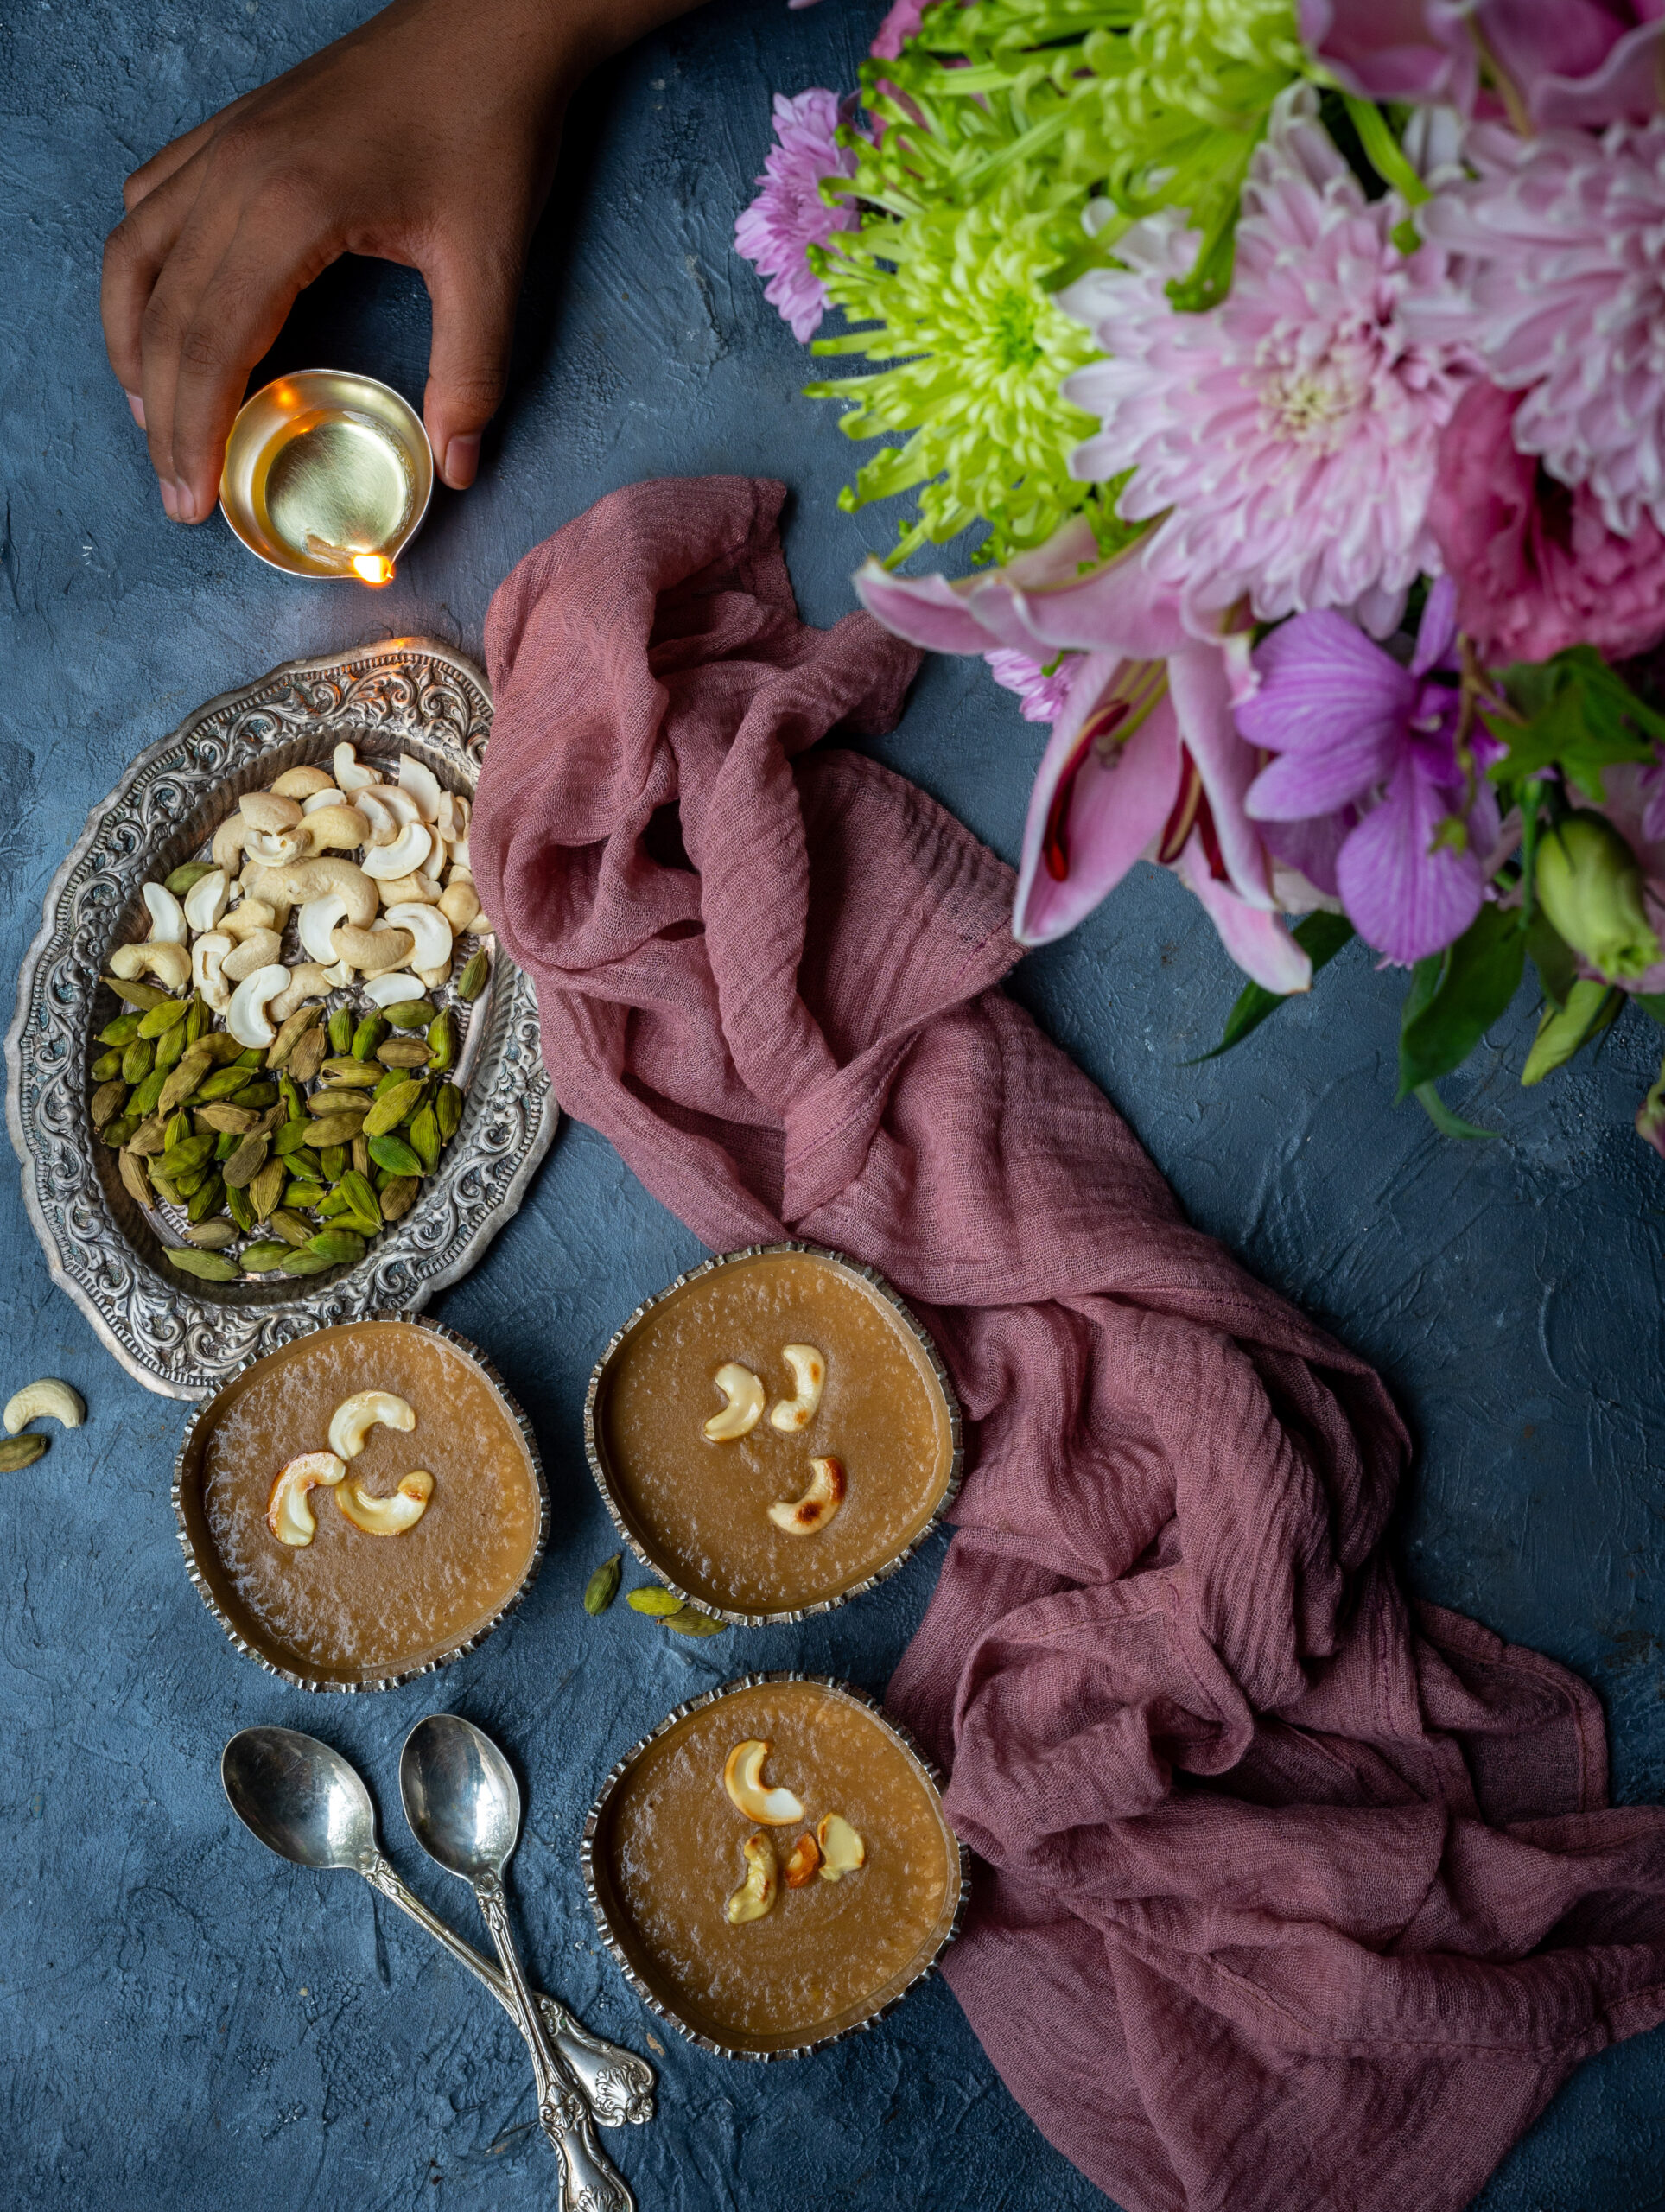
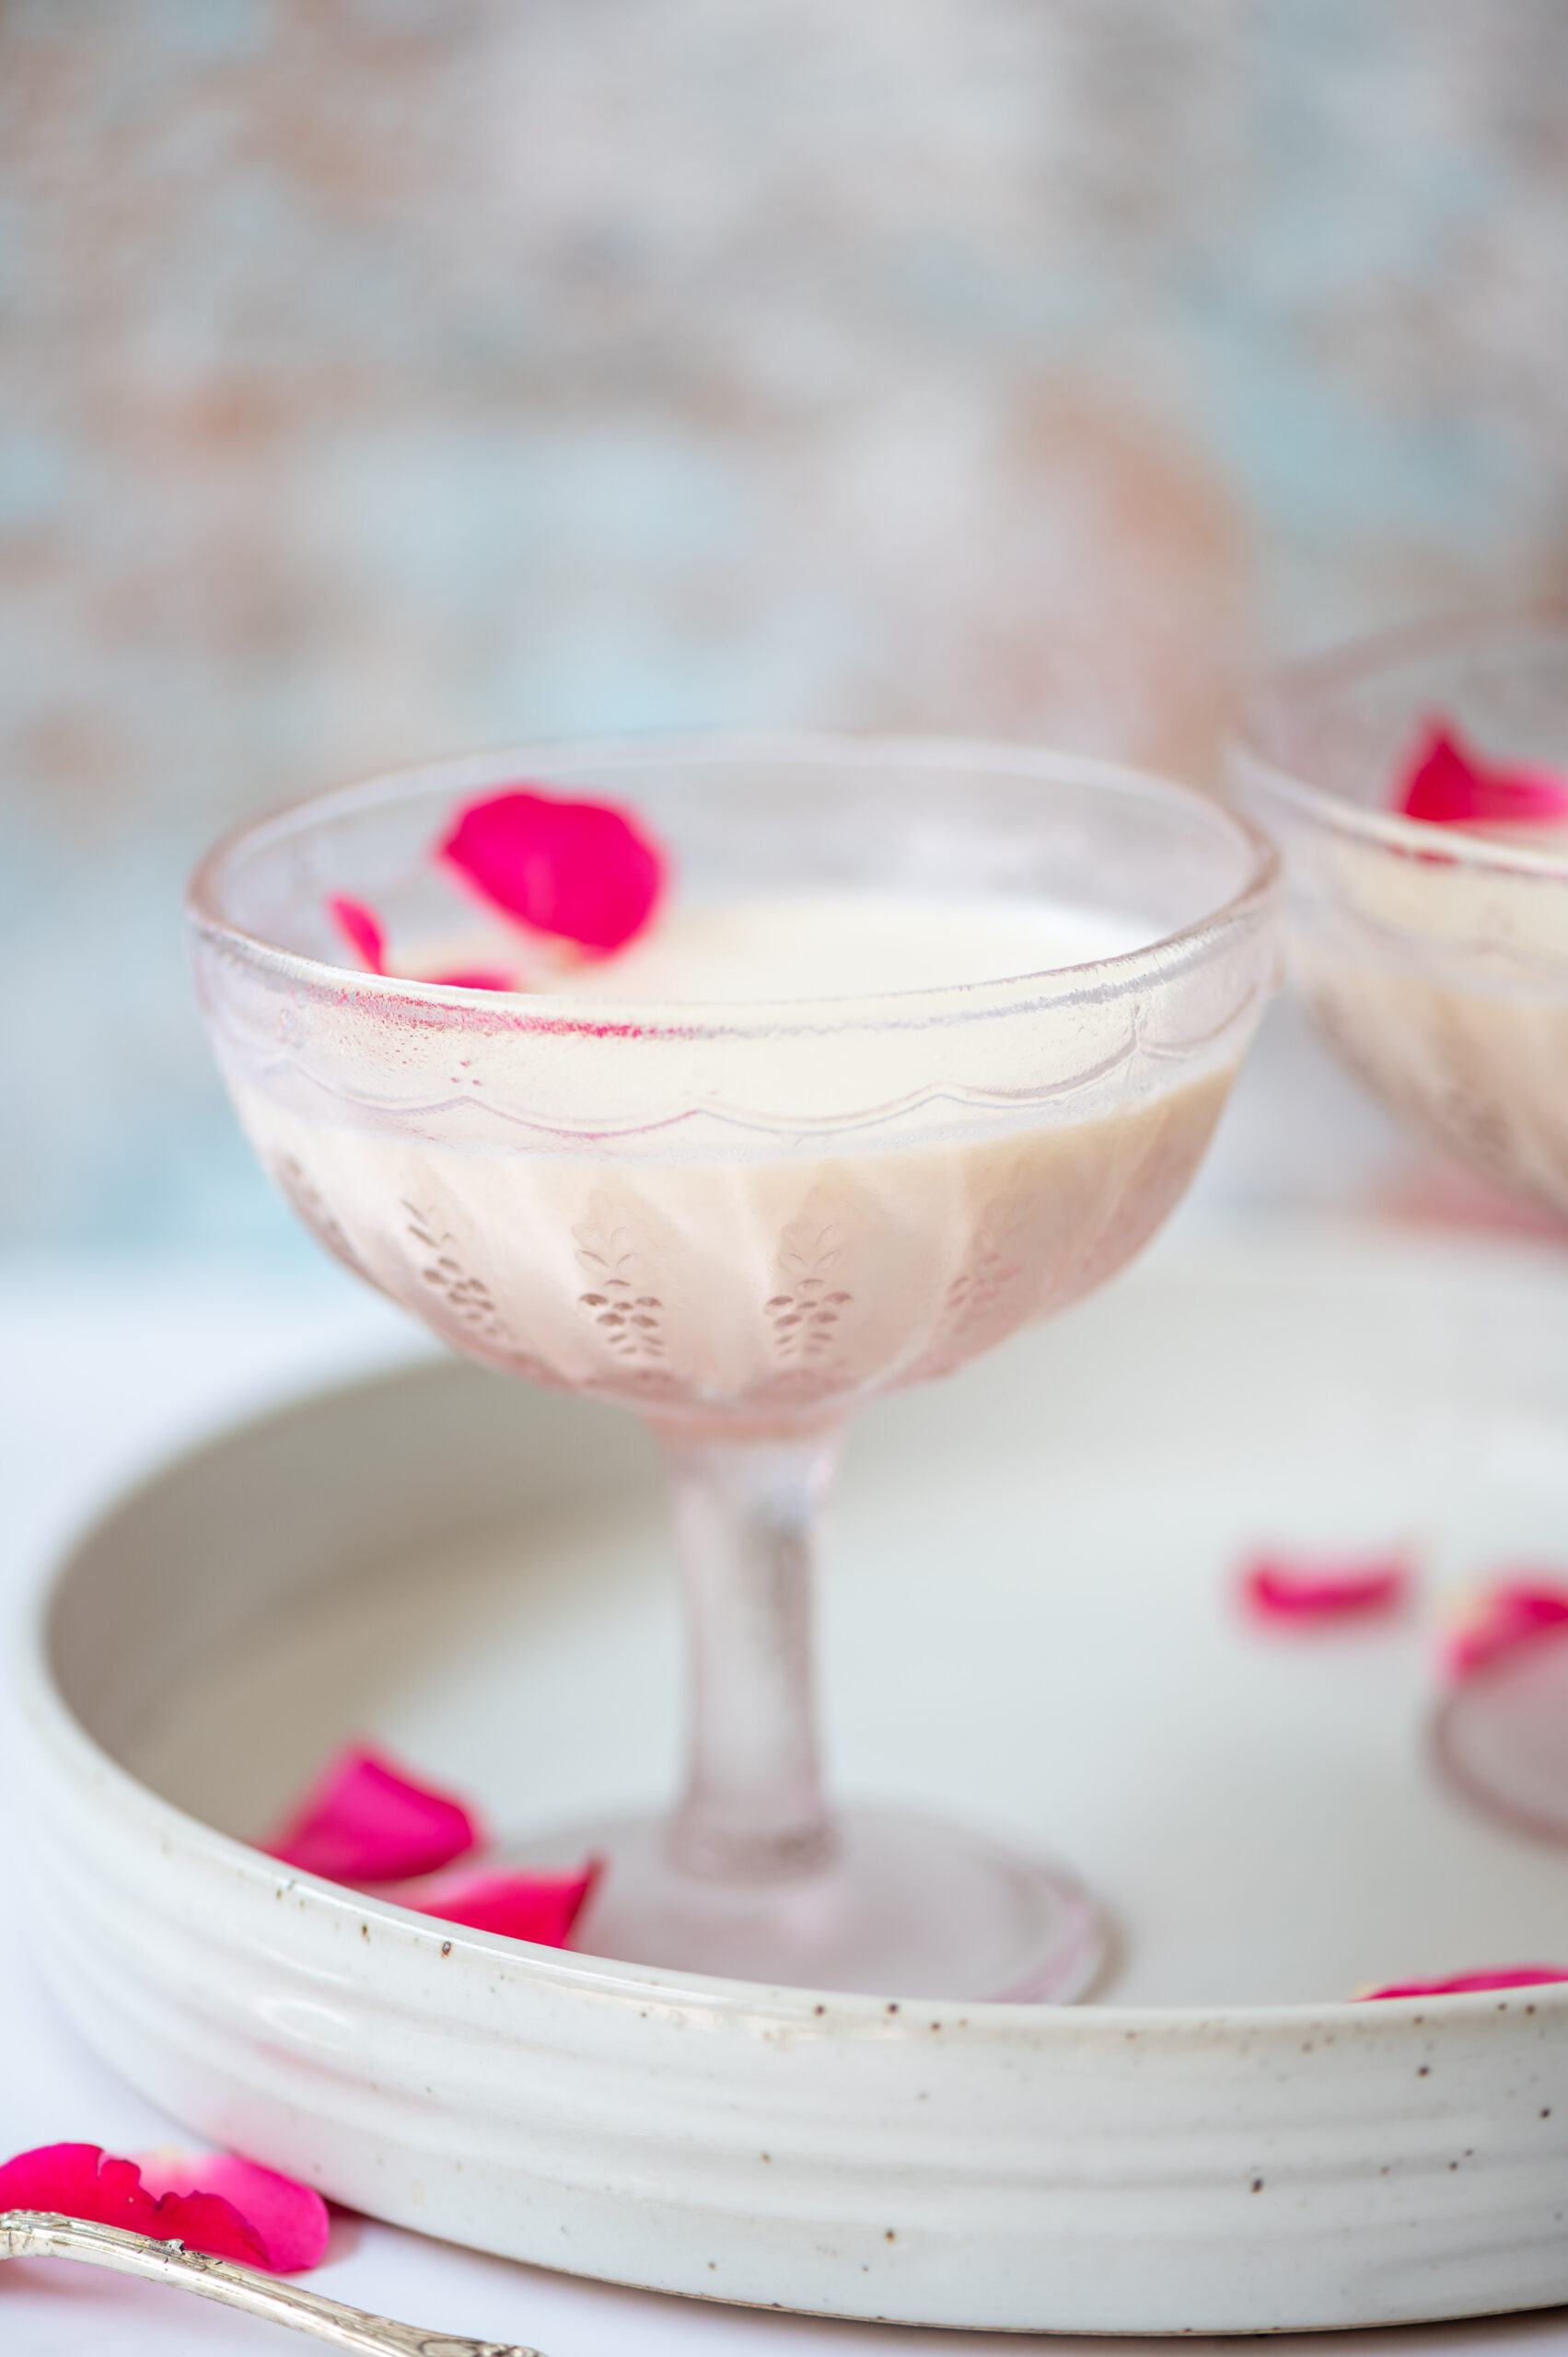
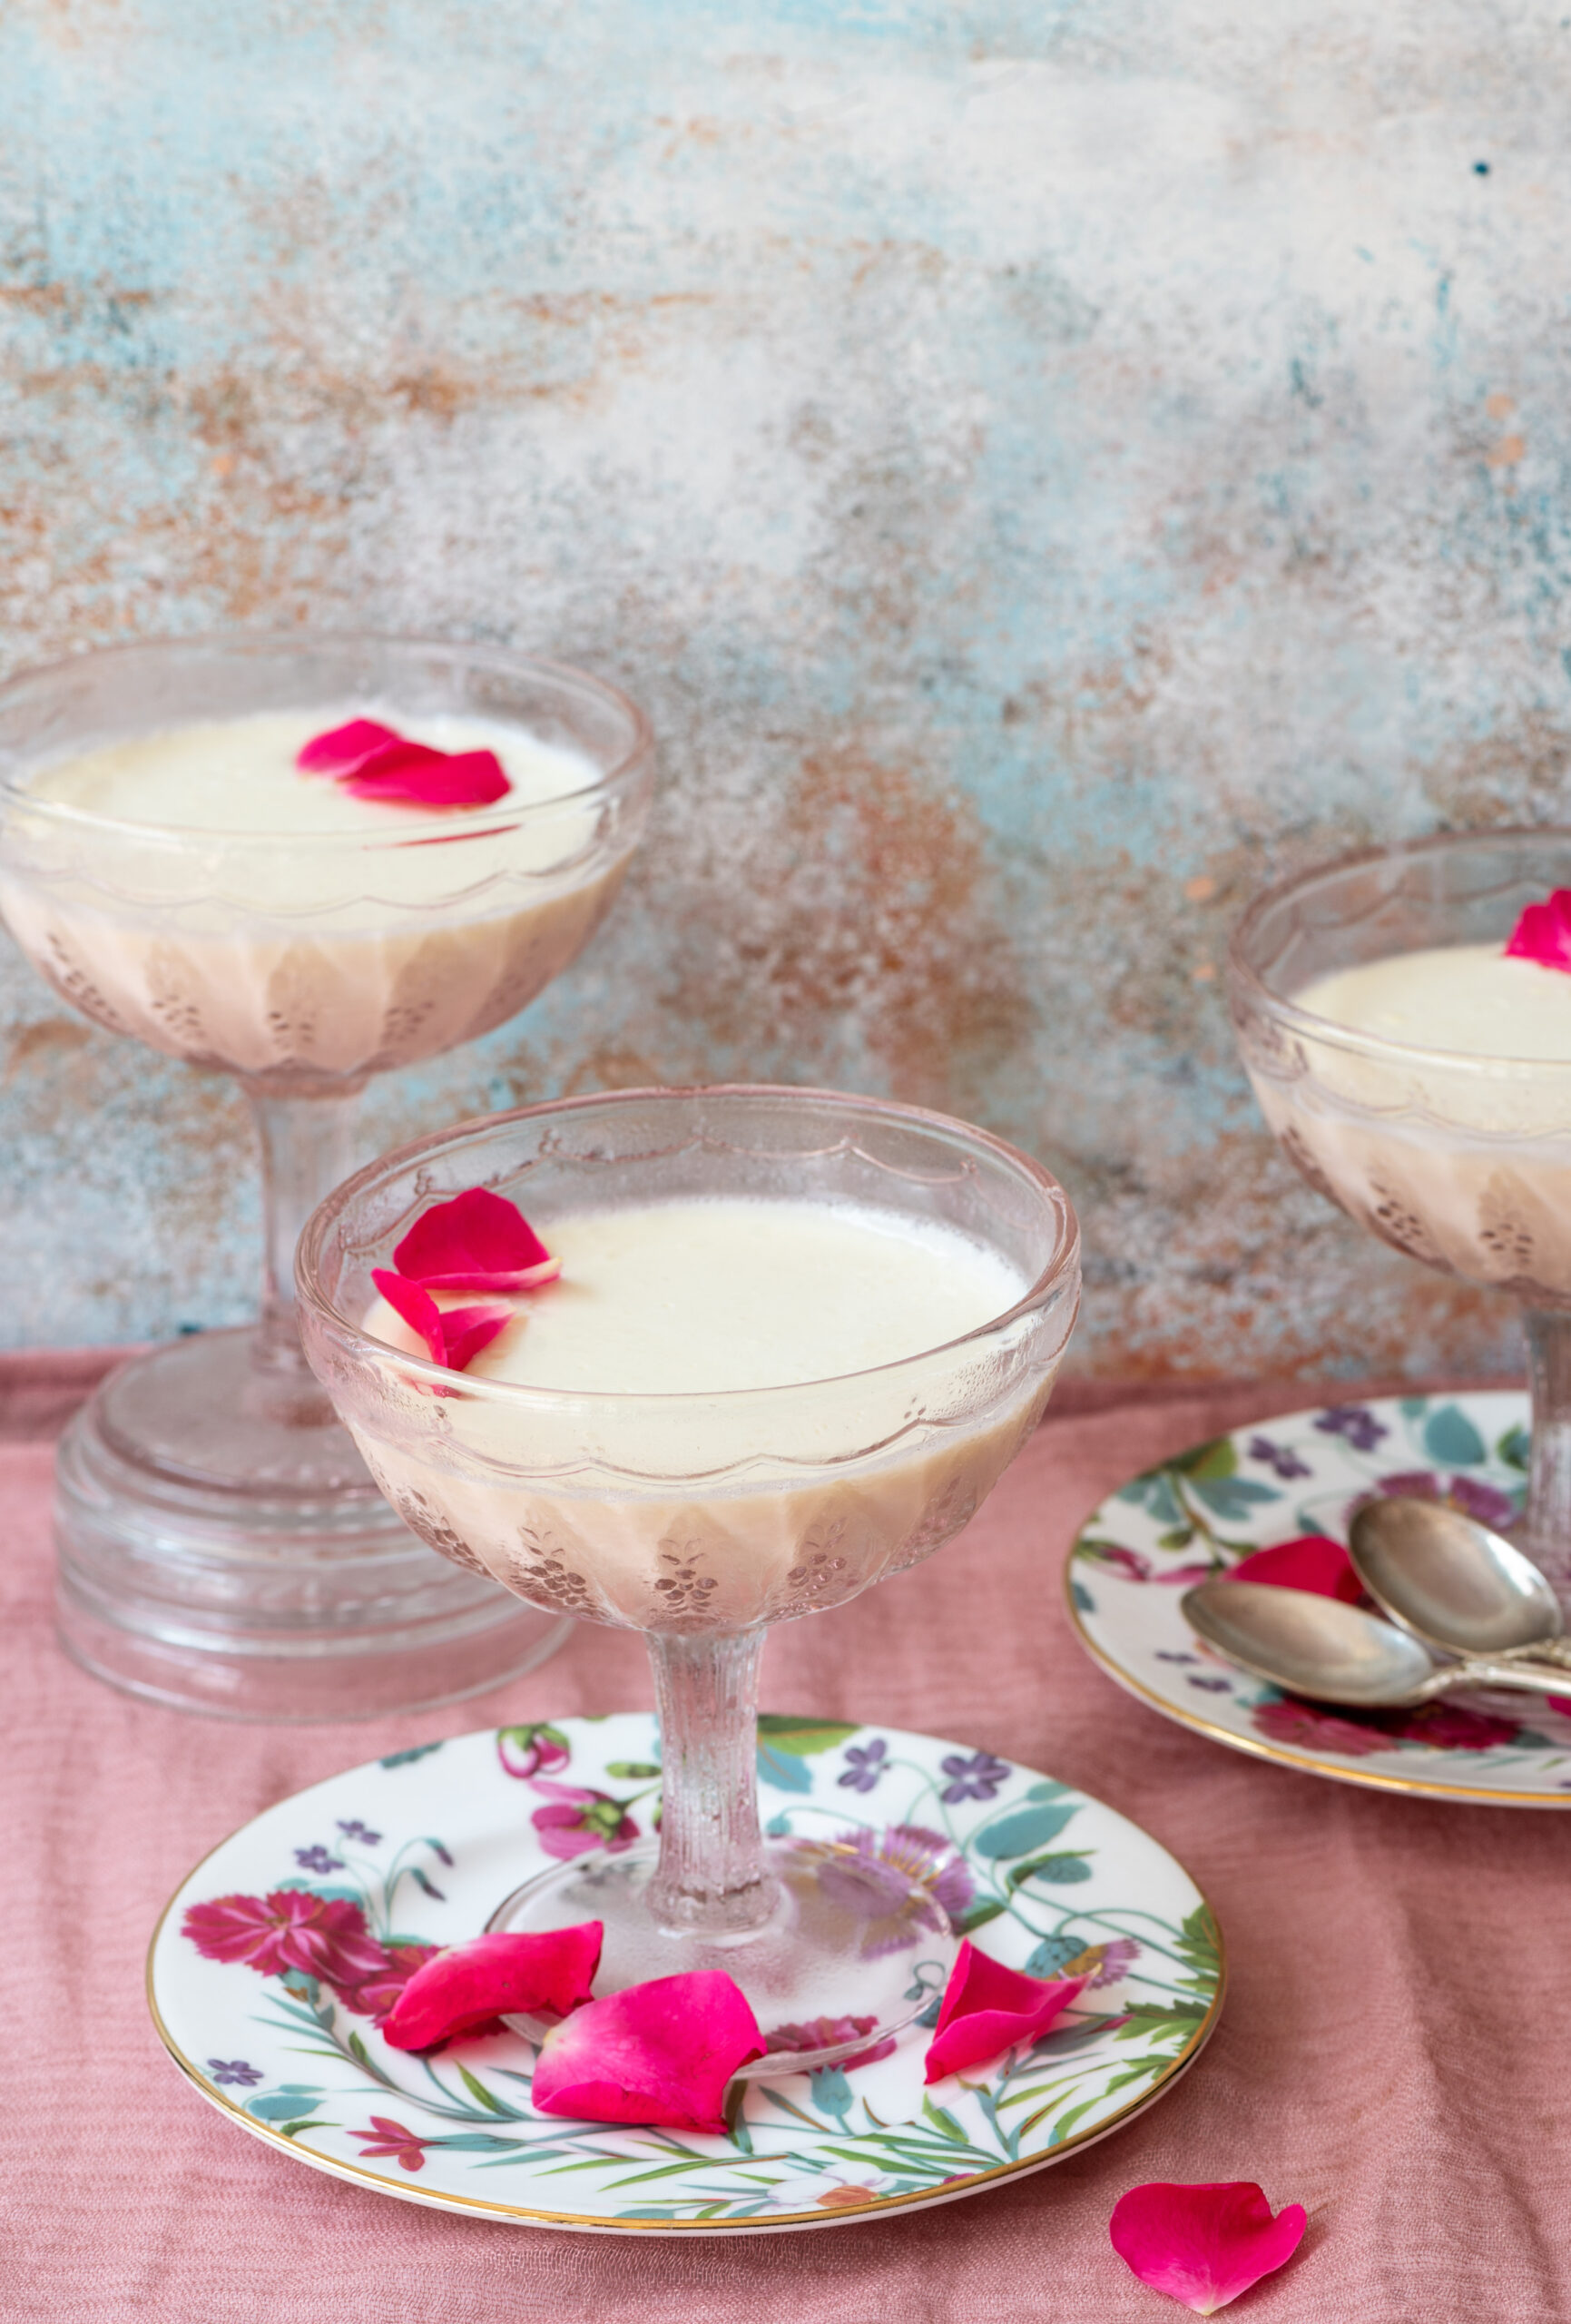
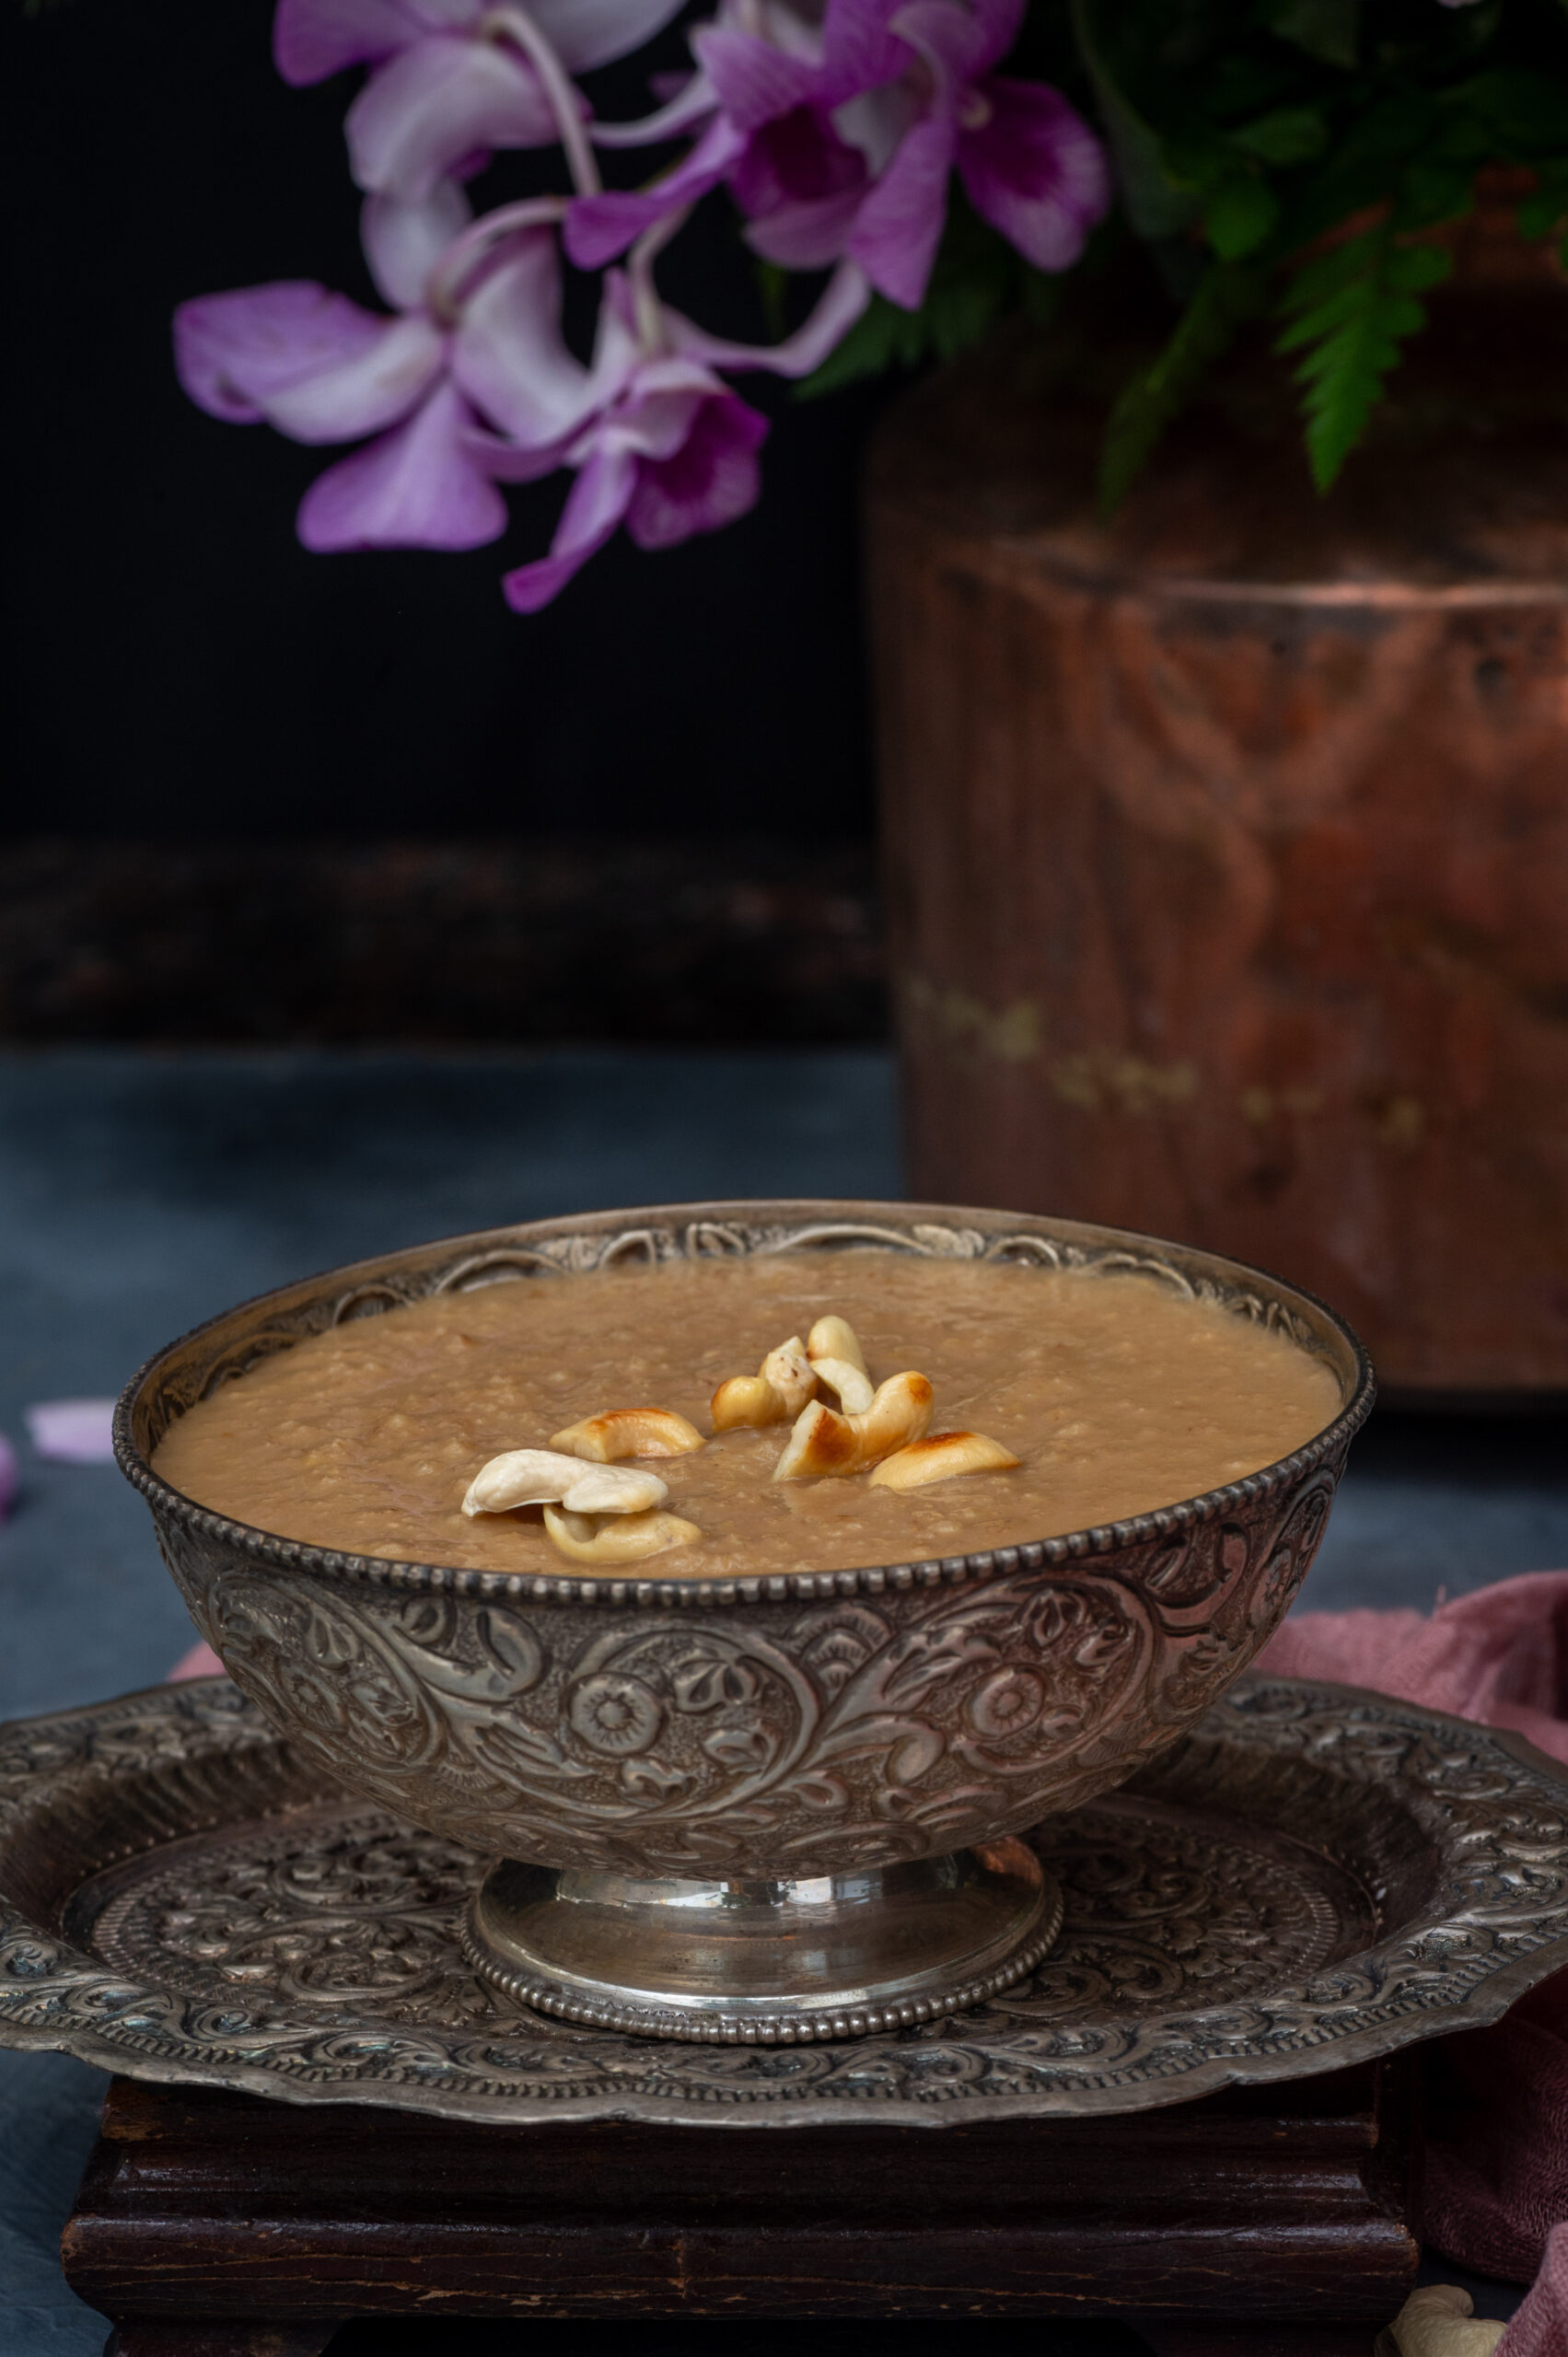
In terms of payasam, I think the paruppu payasam (made with dal) is probably the most common. I always reach out for it whenever I have a banana leaf meal at a South Indian restaurant. It uses dried coconut bits and also contains jaggery, which is healthier than sugar yet satisfies my sweet tooth. Drawing inspiration from it, but adding my own twist, I have opted to use coconut milk in my foxtail payasam. The coconut milk, along with a cashew garnishing, adds a richness to it. You may also wish to use raisins, and reduce the jaggery quantity accordingly. Or you may want to use coconut sugar instead of jaggery. You may even want to replace the millet itself, just as you can also replace the moong dal with toor dal.

If you are a young adult making festive goodies for the first time, this is an ideal recipe for you to try wherever you are. It is simple and utilizes easily available ingredients. The world has become a smaller place, and I have no doubt that you’ll be able to find them even if you’re spending Deepavali away from home.

I have a South Indian daughter-in-law now and I wanted to prepare something this year that is familiar to her and the region she comes from. Thus, this foxtail payasam serves as a welcoming sweet for her as she enters our family. It is her first Deepavali with us, so it is really special. This recipe is for her, most of all. It is also for my sister, who always asks me to show her something new from South Indian cuisine whenever she visits me, and is very curious about what I am making at this time of year. It goes without saying that it is also for you: I wish you and your loved ones a blessed festive season, and much joy ahead!

Foxtail Payasam

(Serves 4-5)

25 grams moong dal (green gram)

60 grams thinai millet (foxtail)

¾ cup jaggery

2 + 1 cups water

1 cup coconut milk

1 teaspoon ghee

A handful of cashews

Rinse and soak the moong dal in water for at least an hour. Strain the water and set aside.

Roast the thinai in a pan for a few minutes or until it releases an aroma.

Next, add the thinai to the strained dal and add two cups of water. Place these in a pressure cooker and cook until tender. Remove the pot once cooled.

In another bowl, add jaggery and to it add one cup of water. Boil this mixture until the jaggery has melted. Strain this liquid and add it to the dal-thinai mixture.

Allow to cook until it all comes together. Finally, add the coconut milk, mix well and turn off the flame.

To garnish: heat the ghee and add the roasted cashew nuts. Toast until golden. Sprinkle over the payasam. Serve hot.

I hope you’ll enjoy this delicious, nourishing sweet this Deepavali and for many years to come!

I suppose that biscuits were originally an English concept, known as cookies in the USA and popular across the world. Here in India, we do have our own versions and adaptations. Take for instance the nan kattai, which I shared my own pistachio-rose rendition of a few festive seasons ago. It is believed to have been created by Dutch bakers in 16th century Gujarat. Similarly, all over India today, little bakeries utilize millets and Indian flavours to make their own biscuits, giving us treats like ragi cookies. All these inspirations put together made me decide to bake Indian spice biscuits, and to share the recipe with you too.

I feel that Indians give a lot of importance to spices in general, and this is in part because many of them grow in India and are either native or at least traditional in this part of the world. They hold a very special place in our cooking, which is why they appear in everything from meats to sweets. Nutmeg, mace, saffron, cardamom and cinnamon come to mind as common elements. I’ve chosen to use a few of these to flavour these biscuits.

It is the beginning of the festive season this year, and of culinary indulgences, so I thought this would be the perfect time to share this recipe. These biscuits go well with the mood and the weather, and are ideal to have at tea time. If you are seeking more recipes in this vein to serve at your special occasions, the archive has lots to offer.

Another reason why I chose to try out a new biscuit is because I realised that I love hoarding props. I have quite a large collection in my kitchen, and I wanted to use some of my cookie cutters out of that array.

Strictly speaking, it’s not really a new biscuit for me, just one I haven’t made in some time. When my daughter was living here, we often baked together, and this recipe was one of our usual choices. It was so lovely having her company, with her young mind and her penchant for ideas and innovations. Baking these made me miss her, and I think I will send her a care package with these home-baked Indian spice biscuits.

Baking also makes me miss my mother. As I have mentioned in numerous posts over the years, she attended a baking class when we were growing up, and this meant that we had all kinds of interesting treats at home. For instance, she made cornflake cookies, dipping the dough in cornflakes before baking. At a time when cornflakes themselves were an unusual concept for us, we were fascinated by these. I remember plucking the cornflakes and eating them separately. I remain deeply inspired by my childhood memories of my mother in the kitchen.

I hope these Indian spice biscuits become a part of many more happy memories – for my loved ones and I, and for you and yours.

Indian Spice Biscuits

(Yield: Approximately 20 pieces)

175 grams unsalted butter

75 grams powdered sugar (sifted)

55 grams custard powder

175 grams flour

¼ teaspoon cardamom powder

½ teaspoon cinnamon powder

8-10 strands of saffron

1 teaspoon milk

¼ teaspoon salt

1 teaspoon baking powder


Preheat the oven to 170°.

Meanwhile, in a small cup, add the saffron and the milk and allow to steep.

Line a baking tray with a silicone mat. Set aside.

With an electric beater, beat the butter until light and fluffy. To this, add the sugar and then the custard powder.

Beat gently, and now add all the spices. Sift the flour and baking powder and add it to the mixture.

Mix gently using your hands. Cling wrap the dough and refrigerate for 5-10 minutes.

With the help of a spoon, or using your hands, make small discs of the dough. Place them apart on the prepared tray.

Bake in the oven for 12-15 minutes or until the edges are golden.

Remove and cool on a wire rack before consuming.

These delicious biscuits have a beautiful flavour to them, one that I am sure will pep up your mood in the late afternoon. You may notice that they are also eggless, which makes them ideal for serving vegetarians. Here’s wishing you a wonderful festive season ahead!

When I was growing up – and perhaps when you were too – cupcakes were a treasured treat. We all looked forward to birthdays because that was when we could visit each other’s’ homes and enjoy them. More often than not, our mothers were the bakers. Today, cupcakes convey memories of a special, and simpler, time. Despite the assortment of goodies that are now easily available, I still feel that homemade cupcakes are a very sweet but almost forgotten gift, especially during festive occasions. To me, they taste of nostalgia and celebration.

Even though I regularly bake cupcakes alongside various other delights for my customers at re:store, as we have now reached the 7th anniversary of this blog, I wanted to do a little more. So, I thought that I would give away a cherished recipe of mine, as a gesture of gratitude for your warmth and support. Here is the recipe for coffee cupcakes, the very same recipe that I use in my work.

My coffee cupcake recipe emerged as a response to a craving I had for something with a tiramisu flavour. While I have opted to use a simple buttercream frosting, you can try this out with mascarpone in order to elevate that tiramisu influence. You can also replace coffee with a different flavour altogether. Here’s another suggestion: include some maple syrup and adjust the sugar quantity accordingly, and the taste will change too. Have fun with how you use this recipe as a base!

I love making my cupcakes bite-sized, and just right. They are not too sweet, yet they conjure up such sweet memories. Here’s hoping to make many more: more gorgeous cupcakes and more great memories too!

Below are a few images of some of the cupcakes that are available at re:store. I hope that they give you some inspiration – either to prepare your own, or to drop me a line. If you are in Chennai and you’d like me to bake something for you, you know how to reach me.

Coffee Cupcakes

(Yield: 12 pieces)

185 grams all-purpose flour

1 teaspoon baking powder

1 teaspoon instant coffee powder

1 pinch salt

110 grams room temperature butter

200 grams granulated sugar

2 eggs

1 teaspoon vanilla extract

½ cup whole milk


Frosting

1 cup unsalted butter

Fresh cream as required

4-5 cups sifted icing sugar

1 teaspoon coffee powder


Preheat the oven to 170° C.

Line the cupcake tray with liners. Set aside.

In a bowl, sift all the dry ingredients together.

In a mixer bowl, add the butter and the sugar and beat for a couple of minutes or until the mixture is light and fluffy. Add the eggs one at a time, scraping down the sides of the bowl. Alternating them, add the milk and flour in two batches and mix gently. Do not over mix once the flour is added.

Now, divide the batter into the liners, filling them up to a 23 level.

Bake for 12-15 minutes or until the skewer comes out clean.

Remove and cool on a wire rack.


To make the frosting: mix the butter, cream and coffee powder. Add the icing sugar in batches and mix gently, making sure the icing sugar does not fly around. Add enough to make the frosting such that it holds up. Beat well into a smooth consistency.

Using a piping nozzle, ice the cupcakes and keep cool until serving. Refrigerate to preserve longer.

My older son loves my coffee cupcakes and asks me for some whenever he visits. He recently came home after a few months, which is a long time for us, and I baked some for him. From being a childhood favourite to becoming a treat that connects me to my own children, cupcakes and I have had a long journey. Those of you who have been with me since the start at re:store have had a long journey with me too, and I hope it’s been a delicious one. Thank you for being here.

I wanted to make a panna cotta recently but didn’t have the time, which is when I decided that something like a kheer would be the next best thing. Isn’t it lovely when we can almost match our cravings with something equally delightful, although different? This dish is all the more special because it uses lychees, which have a really short season. This lychee kheer is simply perfect as a cold dessert for the summer.

I really love Indian lychees, even though I know that they originate in East and South East Asia. The flavours of each variant depends on the location, and the Indian-grown ones are my favourite. Perhaps it’s just that I am used to that taste. Similarly, mangoes grow all over the world but there is nothing like an Indian mango to me, the ones we find in our own neighbourhoods. Incidentally, lychees are at their own best during a short time during mango season. They are also more suited to the heat, as they are definitely more cooling than mangoes. Since lychees have a short season, I want to add that you can use tinned ones too – the kheer will taste just as good.

In fact, the memory of some very cool lychees were what inspired this dish. I had visited a friend a while ago, during another lychee season, and she had peeled and frozen the fruit. We enjoyed these after a lazy afternoon lunch, and they tasted like ice cream. I will never forget how that day was: gossip, food, laughter and the delicious frozen lychees melting in the mouth.

I have shared below a very basic recipe that focuses on the flavour of this fruit, but I have found that it pairs quite well with coconut and/or rose too. As I have so much of it on hand from the trees at home, I’ve added some grated coconut, which is optional. I’ve also found that saffron and almond, despite being typical kheer flavourings, don’t quite match. Still, go with your gut instinct and choose to add what you’d like to. Or else just stick to the simplest version, for it really is quite wonderful as it is.

Lychee Kheer

(Yield: 6 cups)

1 litre milk

½ cup broken rice (washed and soaked)

½ cup sugar

1 cup lychees

2 tablespoons grated coconut (optional)


Boil the milk until it reduces a little, then add the soaked broken rice. Substitute with whole grain if you prefer.

Allow the rice to cook in the milk. You will notice when the rice cooks and the milk reduces further. Once cooked, the rice becomes tender. Now, add the sugar.

I used a hand blender to gently whip the mixture so the rice breaks down further.

Remove from the flame and cover. Allow to cool to room temperature, then refrigerate.

Meanwhile, peel the lychees and chop finely. Add them to the kheer along with the grated coconut, if you are using it, and stir well. Refrigerate again and serve cold.

The main thing that gets in the way of making this dish properly is that you will have to be careful as you peel the lychees not to pop them into your mouth! I hope you have a nice big bunch around, as you’ll find it very tempting to do so. Trust me, putting them in the kheer is well worth it – try it out, and you’ll see.

Since we are still bang in the middle of summer, when mangoes are abundant, I simply must share yet another mango recipe. I had been longing to make a tart for ages, but was held back by the worry that I would not be very good at it. However, I reminded myself that when you come down to it, baking is very simple. There are different methods, but it’s about following one method to a tee (for my beginner’s intro to baking, do check out this post). So you could say I went back to my own basics, and made myself this very marvellous mango tart.

When I say that mangoes are abundant, I mean both in the market as well as in my back garden. It’s funny how I actually take them for granted. There are just so many hanging on my three different varieties of mango trees – each of which yield very sweet fruit. I know that one is the killimooku, and one is the sindoora. As for the last one, I’m uncertain of the species but it tastes great just the same. I give away lots of the harvest, but the fruits are so flourishing at this time of year that I sometimes just have to leave them on the trees. There are monkeys, squirrels and parrots in the neighbourhood that enjoy them too, and more often that not, I let Nature do its thing. The birds and animals eat the fruit, drop the seeds somewhere in the yard, and now and then I find a young mango shoot emerging from the soil. These little discoveries remind me of how amazing life itself is.

Besides which, look at the beautiful colours of this sindoora. I enjoy even just admiring the fruit on the tree (though of course, I probably enjoy eating it all the more).

Not needing to buy mangoes has many perks, including that I know that the ones at home are naturally ripened and grown. I’m aware that many store-bought mangoes are either sweetened or advanced through chemical processes, and am grateful that I can avoid these.

When I do eat mangoes from beyond my own backyard, they are usually the ones in friends’ backyards. There is a lot of exchange that happens this season. That’s how I got my hands on some luscious Alphonso mangoes. They are delicious and the flesh is a lovely orange colour that makes the tart altogether very pretty. Any sweet mango variety, available all over the subcontinent now, will work perfectly for this dish.

Mango Tart

(Yield: 9’ tart)

1¾ cups flour
¼ cup almond flour
½ cup powdered sugar
½ cup cold butter
½ teaspoon salt
1 egg

Filling:
½ cup mango pulp
1 cup milk
¼ cup powdered sugar
3 tablespoons cornflour
1 teaspoon agar agar

Preheat the oven at 160°C for 20 minutes.

Add all the ingredients for the filling in a bowl. Set aside.Crumble the butter with your fingers along with the flour and the egg. Gently bring it all together until you get a smooth dough. Cover with cling film and refrigerate for at least 30 minutes.

Remove the dough from the fridge. Using parchment papers, roll the dough gently into a 12’ roll and place carefully over the tart pan. Using your hands, press the sides down. With the help of a fork, pierce the tart base so that it does not fluff, and cover with foil (you can use lentils to weigh down the foil). Bake until golden, which will take about 25 minutes. Remove from the oven and allow to cool a little.

Meanwhile, add the milk, mango pulp, sugar, cornflour and agar agar in a pan. Stir well. Now place on a medium flame and stir constantly until it thickens. Set aside.

Once the filling cools down a little, and the tart base is at room temperature, pour the custard over the tart. Refrigerate for 30 minutes. Decorate the top of the tart with sliced mangoes and any other garnishing of your choice. Refrigerate for at least thirty minutes before serving.

I know many people use biscuit crumbs as a tart base, but I like making it from scratch this way. Now that I’ve done so and gained confidence in my tart-making skills, I’ll certainly try making it with other kinds of fruit too. For now, here is a lovely mango tart. I hope you’ll be inspired to try it out too!

After many travels, I have finally been back home and quite gladly too. It has been lovely to just relax, and be right where I want to be. I was recently struck by something that Michelle Obama said in The Light We Carry, her interview with Oprah Winfrey: “Home is where Barack is”. These words were so sweet, and in some ways resonated for me too. I realised when I heard this line that I had been missing my husband while I was away. He may not be the president of a country, but he is certainly the president of this house. We were watching the interview together on a Sunday evening, and with those loving thoughts in my mind I set about baking for us as I often do on weekends – and the result that day was this vanilla coconut bundt.

A cake like this goes so well with this hot summer weather. It is extremely flavourful, and all the ingredients are easily available. The coconut grows in my own backyard, as I’ve said umpteen times before, and I thought it would be great not just seasonally but also as a fitting finish to this All Things Tropical recipe series I’ve recently shared.

A bundt is a kind of sponge cake or tea cake, and keeps for a bit longer. That’s one of the good things about it. We try to control ourselves by not eating half the cake in one go, and these days it’s keeping us happy over a few days for sure. I must admit that this may be because the kids are away, which is a bit of a sore topic for me. I never actually felt that empty nest problem when they went off to study. But I feel it now, now that they are in their late 20s and have their own lives as adults, their own worlds of friends and family. It is similar for my husband too. So small things like this vanilla coconut bundt cake cheer us up.

Speaking of our children’s generation and ours, and to return to Michelle Obama’s very impressive accomplishments and sentiments – I suppose it also has to do with age. When you are younger, you want to do everything – you want to achieve so much, you want to build empires, you want to make a name for yourself. But there comes a time in your life when all you really want, once you have met all your ambitions, is to spend time with your loved ones. Your partner first and foremost, and then the rest of your family. My husband and I now feel able to make time for each other despite our busy schedules. We come home to each other, and to treats like this recipe. This vanilla coconut bundt can pep up any evening and in my opinion can impress the president too – of a country, or at any rate of a home!

Vanilla Coconut Bundt

(Yield: Serves 6-8)


250 grams soft unsalted butter

225 grams granulated sugar

2 teaspoons vanilla extract

2 whole eggs

250 grams all purpose flour

½ teaspoon baking soda

1½ teaspoons baking powder

¼ teaspoon salt

¾ cup desiccated coconut

1 cup coconut cream

½ cup fresh cream


Preheat the oven to 160°C.

Grease and dust the bundt pan well. Set aside.

Add the flour, baking powder, baking soda and salt and sieve. Set aside.

In a bowl, add the butter, sugar and vanilla extract. Blend well until fluffy.

Now, add the eggs and beat well until incorporated. Next, add the flour mixture and fold gently. Then, add the coconut cream and desiccated coconut. Fold until it all comes together.

Spoon the mixture into the bundt pan and bake for 45 minutes or until a toothpick comes out clean. Then, remove from the oven and allow to cool for 15 minutes.

Upturn the bundt pan and tap gently. Remove the pan. Allow the cake to cool completely before you drizzle the fresh cream on top. Your beautiful vanilla coconut bundt is now ready to serve.

The bundt has made a couple of appearances on this blog before, such as this citrus bundt cake and this lemon poppy bundt cake. If you enjoy this style of cake, you may want to explore those recipes too.

Every summer, at least once, I simply have to make coconut mousse. It is a light, airy, faintly sweet eggless dessert, which also makes it perfect for some of the entertaining that I do. I have many friends and relatives who are vegan or vegetarian, or who don’t like eggs. What’s also nice about it is that I can prepare it and put it in the fridge and theoretically it will last for a few days (of course, it disappears quite fast). To me, this eggless rose-coconut mousse is the perfect Indo-Western dessert.

In addition to the tropical taste of coconut, I also use a hint of rose, which makes it a kind of fusion dish. As a mousse or pudding of sorts, it is Continental in form but the flavours are more Indian to me. I have to admit that the first time I made it, I used less agar agar and it turned out almost like a kheer or a payasam. This is not to say that that didn’t work – it was delicious too. The consistency of the mixture determines what you can name the dish. I have used fresh, tender coconut meat, but you can also use grated coconut or coconut cream to thicken it.

I also very quickly realised that you can make a mousse with any kind of fruit puree, as long as you add agar agar and use flavours that complement each other, such as coconut and rose. If you aren’t a fan of these flavours, you can substitute them. Try saffron instead, or lavender perhaps. Maybe make it with a different ingredient each time, and play around with the garnishing too. I like to make this in individual cups as it feels more personalised, but you can also just put it all in one bowl and scoop out from it. Alternately, put it in a bowl with a lovely shape and upturn it once it has set.

The first time I tasted coconut mousse was at a very dear friend’s home, and she kindly shared the recipe. As you may know from several earlier recipes, summers mean an abundance of coconuts in my home thanks to the trees in the backyard, so I made this a part of my annual repertoire ever since. Looking at the trees always reminds me of how when we were growing up, our household staff would shave off the leaves, gather the stalks, and make a broom. How simply we used what was in our surroundings. Every part of the coconut tree was used. The image of her crafting the broom comes to me whenever I talk about homegrown coconuts. This also reminds me that it’s that time of year for me to make cold-pressed coconut oil too.

Eggless Rose-Coconut Mousse

(Yield: Serves 6)

1 can condensed milk

1 cup fresh cream

1½ cups fresh coconut milk

1 cup whole milk

10 grams agar agar

½ cup boiling water

1 cup tender coconut meat (finely cut or blended)

2 teaspoons rosewater

In a bowl, add the boiling water and then add the agar agar. Stir and allow to melt. Set aside.

In a large bowl, add the condensed milk, fresh cream, coconut milk and whole milk. Stir.

Strain and add the agar agar with the milk mixture. Add the coconut meat and rose water. Mix it all gently, using a hand blender.

Pour into the desired bowls and refrigerate overnight.

Serve cold.

This marvellous dessert is really so refreshing – perfect for summer and rich with tropical flavours. If you’d like to explore more of my dessert recipes, do check out a selection here!

(above: re:store’s almond brittle)

(above: re:store’s date squares)

(above: re:store’s fig rolls)

(above: re:store’s chocolate cupcake)

Maintaining a standard of quality that is always up to the mark is very important to us at re:store.

Everything that is prepared in the re:store kitchen is exactly what my own family eats, and I put the same amount of care and effort into preparing it. In fact, when one of my kids comes home to visit, I always pack them a parcel of re:store goodies (sugar-free, as well as some with sugar) when they go back. The date squares, almond brittle and fig rolls are perfect for this, as they are travel-friendly and keep for a while. And when my kids are here at home, they regularly enjoy many of the re:store cake varieties too.

Before I introduce any new product, I put in a lot of research, conduct several trials, and get as much feedback as I can from friends and family. Only after that will I offer it to my clients. You can see the current product list here. I really look forward to your orders in the coming year and beyond.

As I said, quality is everything at re:store, as it is with everything else in life too. That’s the thought I am going into 2023 with.

My wish for us all is for good health. I can see that ever since the pandemic began, food has become a major focus for many. People have come to accept that what we consume can be the cause or the prevention of many illnesses. That said, let us not body-shame or take medications to change our bodies. Let us instead reflect on how food can be the source of our overall well-being. Let us also consider traditional and seasonal ways of eating, as passed down in one’s community or location. Let food be what helps us resolve issues.

I’m not denying that we need our indulgences, yet I believe – especially through the creation of my baked goods and confectionery at re:store – that even these can be nourishing and clean.

Wishing us all a healthy and delicious year ahead!

The celebrations of Diwali are soon followed by the celebrations of Christmas, and when I was growing up this meant that we enjoyed a couple of months of ongoing festivities. My most cherished childhood association of Christmas has to do with a large Anglo-Indian family we knew. They were wonderfully warm and welcoming, and Christmas day for us was all about visiting them and sharing in the cheery mood in their home. Until they came into our lives, the festival was something I had only encountered in books, so to actually experience it was thrilling. I will never forget the first time I saw a Christmas tree, all decked out in their home. Under it, there were always such lovely gifts for us friends of the family, and I looked forward to these each year. Of course, there was also the spread of delectable festive goodies. These special memories are on my mind this month, which is why they have inspired my sharing of this all-spice cake recipe.

Fast forward to today, and Christmas now for me is all about absolutely delicious plum cakes, received from many friends. As you may know, plum cakes last for between six months to a year depending on how they are made. This means that I am at liberty to enjoy them for a nice long stretch. Just a slice at tea now and then makes the perfect accompaniment. After re:store cakes, of course!

I’ve never attempted at baking a plum cake myself as I know it’s a laborious process, both in technicalities and in love. Besides which, there is such sweetness in receiving them from dear friends. Nowadays, there are vegan and vegetarian and alcohol-free options out there, but there’s nothing like a good old rum plum cake. So while I’ve never gotten down to experimenting with it as a baker, I have really enjoyed making the next best thing.

This all-spice cake, made with a readymade all-spice mix that is full of the goodness of cardamom, cloves and more, has come out so moist and delicious. Maybe it will be one of my own seasonal traditions in future – and perhaps even yours.

This time of year is full of activity for me – visiting friends, special occasions, events, art shows and so on that I am really enjoying every single day. I am also kept busy with fulfilling re:store orders that bring delight into many people’s homes. So much so that it’s almost a struggle to keep up with regular posts on this blog, but I made a promise to myself that I’ll continue sharing my love of cooking with everyone I can reach.

So here I am with a recipe that you can learn to bake ahead of your Christmas feasting, or at any time of year. This will be followed by a cookie post, so do keep an eye out for that as well.

All-Spice Cake

(Yield: One loaf)

200 grams maida

175 grams sugar

60 grams milk

60 grams boiling water

1½ teaspoons baking powder

¼ teaspoon baking soda

½ teaspoon salt

1 teaspoon all-spice

75 grams oil

2 eggs room temperature

25 grams Greek yoghurt

1 teaspoon vanilla extract


Preheat the oven to 170° C. Prepare an 8” loaf tin by lining it with butter paper and coating the edges with butter and flour.

Sift the flour, salt, all-spice, baking powder and baking soda separately. Set aside.

Mix the milk and hot water together. Set aside.

Now, beat the oil and the sugar together. Add the eggs and beat again. Add the vanilla extract.

Then, add the liquid and dry ingredients alternatively, folding each into the mixture with a spatula. Make sure the sides are scraped down properly.

Pour the batter gently into the loaf tin and bake for 35-45 minutes.

Remove from the oven and set the tins aside. After 15 minutes, remove the loaf and cool it on a cooling rack.

Decorate as you wish, and serve. Season’s greetings!

When I say that wish you lots of peace, I mean it deeply. In today’s day and age, we could all do with it – not just for ourselves, but for the environment, in the world, and for every community. Wishing you a very merry, peaceful and delicious Christmas!


My mother often made caramel custard at home while I was growing up. It was a dessert we all enjoyed, and it was her personal favourite too. I go back to memories of her and her teachings all the time, but especially more so nowadays when I am missing her a lot. At this time, I tend to have what I call “solo conversations” with her. I never did learn this recipe from her when she was around, and preparing it now is a kind of ongoing connection with her too. While she made hers plain, mine has a citrus twist – it is an orange caramel custard.

My understanding is that many of us take our parents, especially our mothers, for granted. I must have done the same. Even after she stopped handling eggs and therefore did not prepare this dish anymore, it did not occur to me to ask her for this recipe. Many of us with deceased parents are also laden with guilt and regret – feelings of I should have done this or that, and so on. But I believe that we need not be. As a parent myself, I understand everything my mother did, and I know that she understood everything I did too – just as I have a sense for whatever my own kids are experiencing.

Even though I still feel like there are so many incomplete thoughts and conversations, I don’t carry any negative feelings. Now, I just feel like I can connect to my mom at any time, and without it being emotionally heavy. That connection consists of my “solo conversations” with her, and these are always pleasant and light and lovely. Rather like this delicious dessert.

Since I did not learn this recipe from her, I did so over a period of time. I rummaged around with friends’ recipes, always wanting to learn how to prepare it well as my family enjoys it very much now too. While I have been making the plain version for a while now, this citrus twist came to me during a short recent break in Assam, where oranges are now in season. Between a feeling of deeper closeness to my mother, and the sight of those ripe orange trees, I found myself dreaming up a version that upon experimenting with, I am particularly happy with. As always, I am happy to share this with you too.


Orange Caramel Custard

(Serves: 4-5)


1 cup fine sugar

2 tablespoons water

150 ml fat milk

300 ml cream

4 eggs

1 tablespoon orange zest

2 tablespoons orange juice


Preheat the oven to 140° C.

Keep a tray which will hold 4 medium-sized ramekins ready.

Pour ¾ of the cup of the sugar into a pan. Add 2 tablespoons of water. Allow to cook on a low flame, stirring occasionally.

Cook until this mixture turns into an amber colour and is caramelized. When this happens, remove immediately from the pan and pour it into the 4 ramekins equally. Set aside.

In another pan, add the milk and cream. Stir until the mixture is almost ready to boil. Then, turn off from the heat and add the orange zest. Stir and allow to sit for somewhere between 15 minutes and half an hour. Let the flavour seep in.

Meanwhile, pour boiling hot water in a tray and set the ramekins into it.

In another pan, beat the eggs and the remaining sugar together. Strain the cream mixture into the eggs, stirring constantly.

Add the orange juice to this mixture just before pouring it into the ramekins.

Place them into the baking tray. Bake for about 30 minutes or until the custard is firm yet jiggly.

Remove from the oven, and allow to cool in the refrigerator for 3-4 hours.

Before serving, dip each ramekin in warm water for half a minute. With the help of a knife, invert the custard. Garnish as you wish and serve. In this kind of weather, I would go for something warming like a cinnamon stick. In fact, you could even let the stick steep in the orange juice for a bit before you add it in, so it becomes more infused with that flavour.

As with many other things, I like my orange caramel custards to look dainty and petite, which is why I’ve portioned them into individual small servings. I also consider this a healthier sort of dessert, since it consists mostly of healthy eggs and dairy.

Do try it out and let me know what you think of this sweet delight. For more desserts, especially with the year-end festivities around the corner, you can explore the recipes here.