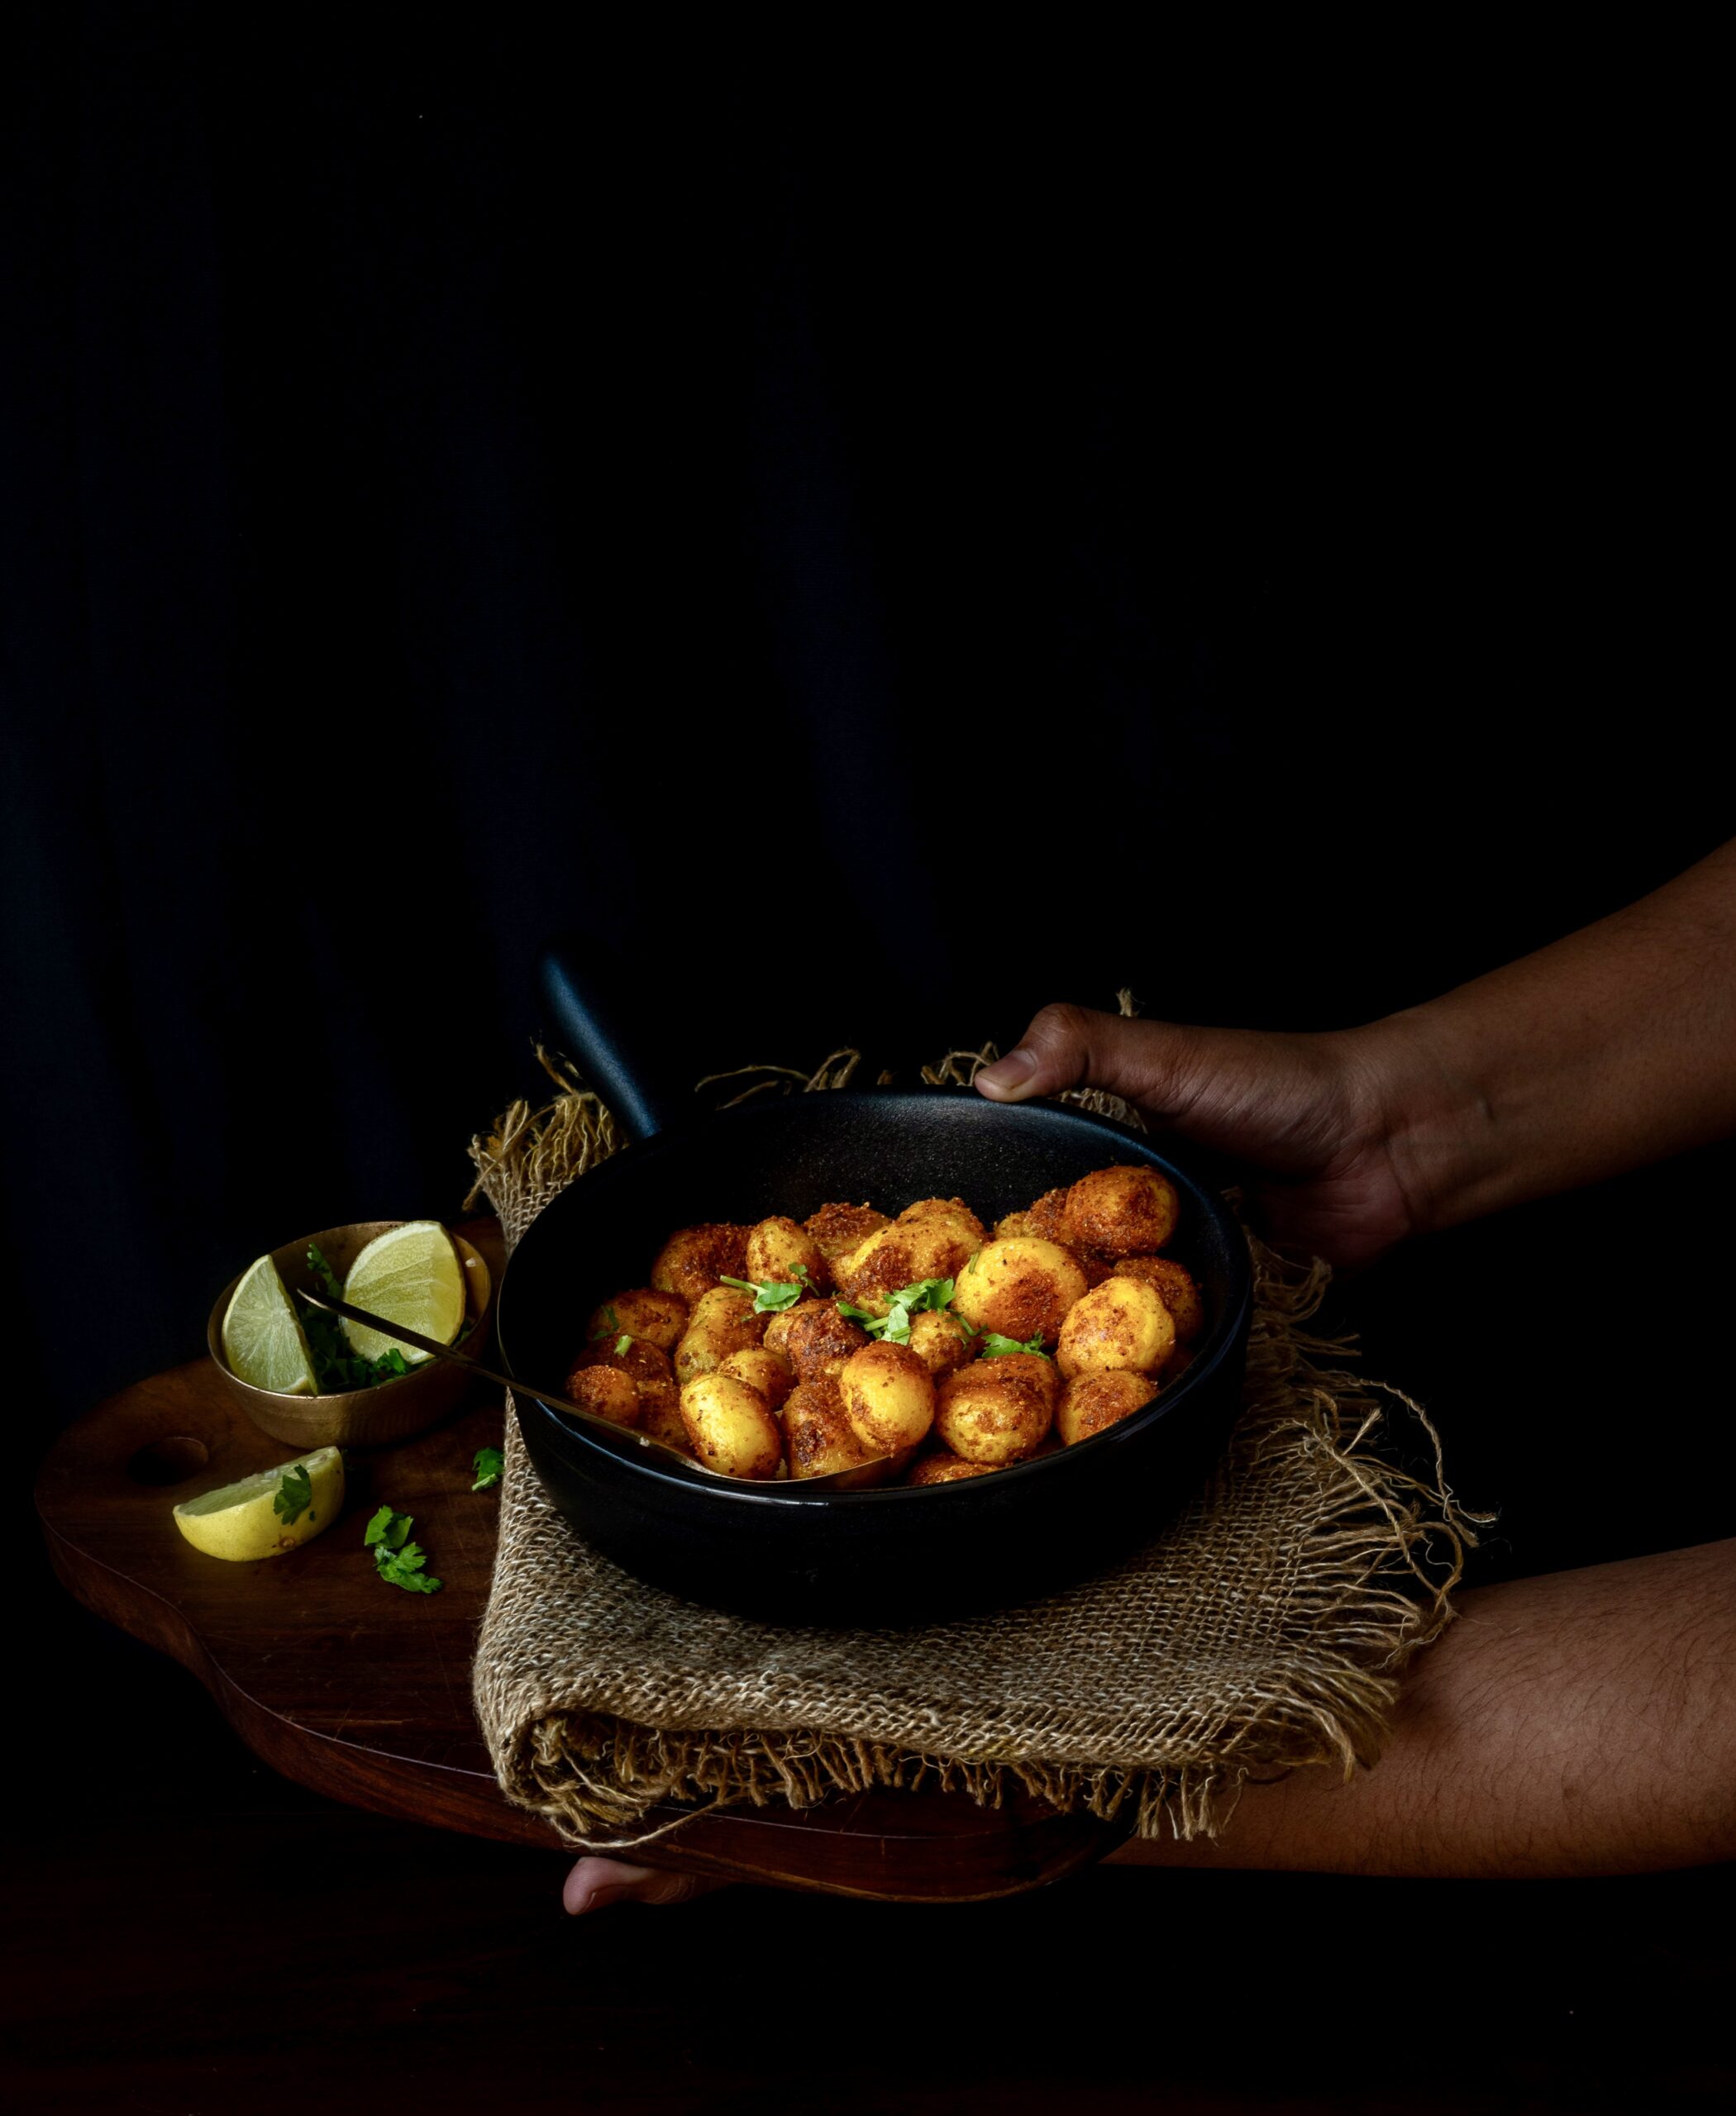
Author

Nandi Shah

Browsing

Over the last several years, I have really felt like I am expressing my artistic side and my creativity through re:store. I pour everything into cooking and photography. So much so that I sometimes believe that I can make anything in the kitchen: cakes, fig rolls, the works. Now and then, however, I come up against my limitations and learn a bit more about myself and about cooking too. For instance, I found that cookies are not my forte, and that cakes are where I tend to shine. That said, I still love baking both, and sharing them with you too. So just in time for Christmas, here is my recipe for eggless cinnamon cookies.

I’m not one to go down the street and find a store in order to satisfy a craving. I would much rather eat home-made fare as much as possible, even when it comes to snacks. I enjoy having a cookie or a biscuit along with my late afternoon tea, so I quite often put something in the oven just for that.

What I am sharing with you here is a very basic cookie which is eggless, easy to make and easy to decorate. I’ve used some fancy cookie cutters just for the fun of it, and in the festive spirit. After all, how long can you go on denying yourself the things you love and enjoy?

On that note, you may have noticed that I’ve shared quite a few sugary desserts of late, and that is because of all the special occasions and entertaining that you (and I) may be doing at this time of year. I assure you that I have lots of lovely recipes lined up for January that are all about healthy and clean eating though!

In the meanwhile, let’s indulge: eggless cinnamon cookies, dipped with chocolate, love and good tidings!

Eggless Cinnamon Cookies

(Yield: 12-15 cookies)


150 grams all purpose flour

75 grams powdered sugar

50 grams cornflour

½ teaspoon salt

85 grams butter

1 tablespoon milk

1 teaspoon vanilla extract

½ teaspoon cinnamon powder

1 cup chocolate chips


Mix all the ingredients (except the chocolate chips) together well with your palm. Form a dough and wrap it in cling film. Refrigerate for an hour.

Preheat the oven to 160° C. Divide the dough into two discs, and with the help of parchment paper, roll them out. Use a cookie cutter of any desired shape.

Bake the cookies for 12-15 minutes or until they turn slightly golden at the edges.

Remove from the oven and allow the cookies to cool completely.

Meanwhile, melt the chocolate chips on a double boiler or in a microwave. Stir constantly.

Remove from the heat. Dip the cookies into the melted chocolate. Then place them on a tray and cool in the refrigerator, or at room temperature in a cool room, until the chocolate sets.

Store the cookies in an airtight tin and enjoy them with your favourite beverage. Whether you have a little treat daily or only now and then, these simple yet satisfying eggless cinnamon cookies are sure to delight you! If you enjoyed this recipe, you may also want to explore these sugar-free almond cookies and these ginger-jaggery Christmas cookies too!

The celebrations of Diwali are soon followed by the celebrations of Christmas, and when I was growing up this meant that we enjoyed a couple of months of ongoing festivities. My most cherished childhood association of Christmas has to do with a large Anglo-Indian family we knew. They were wonderfully warm and welcoming, and Christmas day for us was all about visiting them and sharing in the cheery mood in their home. Until they came into our lives, the festival was something I had only encountered in books, so to actually experience it was thrilling. I will never forget the first time I saw a Christmas tree, all decked out in their home. Under it, there were always such lovely gifts for us friends of the family, and I looked forward to these each year. Of course, there was also the spread of delectable festive goodies. These special memories are on my mind this month, which is why they have inspired my sharing of this all-spice cake recipe.

Fast forward to today, and Christmas now for me is all about absolutely delicious plum cakes, received from many friends. As you may know, plum cakes last for between six months to a year depending on how they are made. This means that I am at liberty to enjoy them for a nice long stretch. Just a slice at tea now and then makes the perfect accompaniment. After re:store cakes, of course!

I’ve never attempted at baking a plum cake myself as I know it’s a laborious process, both in technicalities and in love. Besides which, there is such sweetness in receiving them from dear friends. Nowadays, there are vegan and vegetarian and alcohol-free options out there, but there’s nothing like a good old rum plum cake. So while I’ve never gotten down to experimenting with it as a baker, I have really enjoyed making the next best thing.

This all-spice cake, made with a readymade all-spice mix that is full of the goodness of cardamom, cloves and more, has come out so moist and delicious. Maybe it will be one of my own seasonal traditions in future – and perhaps even yours.

This time of year is full of activity for me – visiting friends, special occasions, events, art shows and so on that I am really enjoying every single day. I am also kept busy with fulfilling re:store orders that bring delight into many people’s homes. So much so that it’s almost a struggle to keep up with regular posts on this blog, but I made a promise to myself that I’ll continue sharing my love of cooking with everyone I can reach.

So here I am with a recipe that you can learn to bake ahead of your Christmas feasting, or at any time of year. This will be followed by a cookie post, so do keep an eye out for that as well.

All-Spice Cake

(Yield: One loaf)

200 grams maida

175 grams sugar

60 grams milk

60 grams boiling water

1½ teaspoons baking powder

¼ teaspoon baking soda

½ teaspoon salt

1 teaspoon all-spice

75 grams oil

2 eggs room temperature

25 grams Greek yoghurt

1 teaspoon vanilla extract


Preheat the oven to 170° C. Prepare an 8” loaf tin by lining it with butter paper and coating the edges with butter and flour.

Sift the flour, salt, all-spice, baking powder and baking soda separately. Set aside.

Mix the milk and hot water together. Set aside.

Now, beat the oil and the sugar together. Add the eggs and beat again. Add the vanilla extract.

Then, add the liquid and dry ingredients alternatively, folding each into the mixture with a spatula. Make sure the sides are scraped down properly.

Pour the batter gently into the loaf tin and bake for 35-45 minutes.

Remove from the oven and set the tins aside. After 15 minutes, remove the loaf and cool it on a cooling rack.

Decorate as you wish, and serve. Season’s greetings!

When I say that wish you lots of peace, I mean it deeply. In today’s day and age, we could all do with it – not just for ourselves, but for the environment, in the world, and for every community. Wishing you a very merry, peaceful and delicious Christmas!


My mother often made caramel custard at home while I was growing up. It was a dessert we all enjoyed, and it was her personal favourite too. I go back to memories of her and her teachings all the time, but especially more so nowadays when I am missing her a lot. At this time, I tend to have what I call “solo conversations” with her. I never did learn this recipe from her when she was around, and preparing it now is a kind of ongoing connection with her too. While she made hers plain, mine has a citrus twist – it is an orange caramel custard.

My understanding is that many of us take our parents, especially our mothers, for granted. I must have done the same. Even after she stopped handling eggs and therefore did not prepare this dish anymore, it did not occur to me to ask her for this recipe. Many of us with deceased parents are also laden with guilt and regret – feelings of I should have done this or that, and so on. But I believe that we need not be. As a parent myself, I understand everything my mother did, and I know that she understood everything I did too – just as I have a sense for whatever my own kids are experiencing.

Even though I still feel like there are so many incomplete thoughts and conversations, I don’t carry any negative feelings. Now, I just feel like I can connect to my mom at any time, and without it being emotionally heavy. That connection consists of my “solo conversations” with her, and these are always pleasant and light and lovely. Rather like this delicious dessert.

Since I did not learn this recipe from her, I did so over a period of time. I rummaged around with friends’ recipes, always wanting to learn how to prepare it well as my family enjoys it very much now too. While I have been making the plain version for a while now, this citrus twist came to me during a short recent break in Assam, where oranges are now in season. Between a feeling of deeper closeness to my mother, and the sight of those ripe orange trees, I found myself dreaming up a version that upon experimenting with, I am particularly happy with. As always, I am happy to share this with you too.


Orange Caramel Custard

(Serves: 4-5)


1 cup fine sugar

2 tablespoons water

150 ml fat milk

300 ml cream

4 eggs

1 tablespoon orange zest

2 tablespoons orange juice


Preheat the oven to 140° C.

Keep a tray which will hold 4 medium-sized ramekins ready.

Pour ¾ of the cup of the sugar into a pan. Add 2 tablespoons of water. Allow to cook on a low flame, stirring occasionally.

Cook until this mixture turns into an amber colour and is caramelized. When this happens, remove immediately from the pan and pour it into the 4 ramekins equally. Set aside.

In another pan, add the milk and cream. Stir until the mixture is almost ready to boil. Then, turn off from the heat and add the orange zest. Stir and allow to sit for somewhere between 15 minutes and half an hour. Let the flavour seep in.

Meanwhile, pour boiling hot water in a tray and set the ramekins into it.

In another pan, beat the eggs and the remaining sugar together. Strain the cream mixture into the eggs, stirring constantly.

Add the orange juice to this mixture just before pouring it into the ramekins.

Place them into the baking tray. Bake for about 30 minutes or until the custard is firm yet jiggly.

Remove from the oven, and allow to cool in the refrigerator for 3-4 hours.

Before serving, dip each ramekin in warm water for half a minute. With the help of a knife, invert the custard. Garnish as you wish and serve. In this kind of weather, I would go for something warming like a cinnamon stick. In fact, you could even let the stick steep in the orange juice for a bit before you add it in, so it becomes more infused with that flavour.

As with many other things, I like my orange caramel custards to look dainty and petite, which is why I’ve portioned them into individual small servings. I also consider this a healthier sort of dessert, since it consists mostly of healthy eggs and dairy.

Do try it out and let me know what you think of this sweet delight. For more desserts, especially with the year-end festivities around the corner, you can explore the recipes here.

I believe that my passion for creativity comes from my mother. In my case, these pursuits include photography and food, both of which this blog is all about. The latter is certainly inherited from her. She was very innovative in the kitchen at a time when resources were not as abundantly available today as market options were more limited. We didn’t have the big fancy supermarkets that we do in India today, and the kirana shop down the road with its fluctuating stock was where we got our groceries. My mom had an incredible knack for preparing dishes with whatever was on hand, and this toasted aloo (potato) sandwich is another one from her repertoire.

Another aspect of life back then was that there were no cellphones or constant connectivity, which meant that guests often dropped by unannounced, usually around tea time. So there was always a need to know just what to whip up in case company arrived suddenly. The criteria: the snacks had to be easy to prepare and only use basic ingredients that would reliably be on hand. The great thing about this toasted aloo sandwich is that it didn’t just meet those requirements, but also looked quite glamourous. As I’ve mentioned before, I think sandwiches are a part of Indian cuisine thanks to the club culture the British brought, so bringing them out at tea meant that charm came into the home setting too.

My mother would use the traditional hand-held toaster over the gas stove, which I have mentioned in the past. For me, there is quite a lot of nostalgia associated with simple dishes like this one. I like regular white bread, toasted and warm, for this one as it’s a part of my childhood. The dish has a very Indian feel to it overall, similar to a Westernized aloo paratha both in taste and comfort level.

Nostalgia, paired with novelty, is one of the reasons why I sometimes host sandwich parties in my home. I have my friends over to enjoy a delectable spread of bread options, fillings, toppings and so on. They get to choose how they want to have their sandwiches, similar to having a personal pizza made on the spot. They can go with a quick fix, perhaps untoasted, if they arrive hungry. Or they can enjoy a more elaborate sandwich. For instance, they may want to have a really basic one decked up nicely with thinly sliced paneer, beetroot chutney, sweet potato or pea mash or other choices. Everyone has a favourite, and it is always fun to explore more.

On that note, here are some of the sandwiches and toasts that have made previous appearances on this blog, and I hope you’ll explore these recipes at leisure: tofu masala toast, pesto parmesan toastie, masala baked beans on toast, cheesy garlic sourdough toast, Bombay toast and cherry tomato yoghurt toast.

First, though, do try out this particular potato-based favourite of mine!

Toasted Aloo Sandwich

(Serves: 2)


4 slices bread

1¼ cups mashed potatoes

Salt to taste

1 teaspoon green chilli-ginger paste

2 teaspoons coriander chutney

Butter as required


Mash the salt as well as the green chilli-ginger paste into the potatoes. Mix well together.

Lay the slices of bread flat. Apply the coriander chutney on all of them.

Divide the potato mixture equally and spread it over 2 slices of bread. Then, place the other slices over these. Apply butter on the outside of the sandwiches.

Toast until golden. That’s all there is to it – a very simple, but totally tasty sandwich. Enjoy!

I have shared various medicinal or immunity-boosting beverages on this blog before, and here is one more to add to the list. It is a home remedy tea that can be used for sniffles, as well as to avoid getting them. You may notice that there are trendy drinks, or drinks for a season, that tend to suddenly be popular, with everyone praising the benefits of the same. My family too goes through such phases when it comes to different kind of foods and beverages. At the moment, this drink is our favourite among the healthy category.

It is meant as a post-lunch drink, and it works especially well at this time as it tastes rather like a tea (without containing any). This has pepper and ginger so it is quite flavourful, and is sweetened with some honey. That’s probably why my kids enjoy it. I’m not a fan of flavoured teabags, and prefer to make homemade concoctions like ginger water or turmeric water, or this home remedy which happens to contain both those ingredients.

Speaking of turmeric (which, as I love to remind you, is the re:store brand logo you can see at the top of this website and on all my product packaging), I must admit that my own most preferred healthy drink is either this turmeric shot, or even more simply, a glass of hot water with a drop of ghee and a pinch of turmeric. I firmly believe that the latter keeps viruses and infections away, and since I consume it at night, I can see that it influences good sleep as well. That one is so easy to put together that it doesn’t require a whole recipe as such, and I would encourage you to try it out too.

Even though the monsoon rains have been rather intermittent so far and COVID feels like it’s over, it’s important to keep our immunity up in general. I hope you’ll enjoy this simple, totally natural way to do the same.

Home Remedy Tea

(Serves 1)

2 cups water

½ teaspoon grated ginger

A pinch of turmeric

A pinch of pepper

1 teaspoon honey


In a pot, add the water along with ginger. Allow to boil. In a serving cup, add the turmeric, honey and pepper. Strain the hot water into the cup. Stir. Enjoy your home remedy tea while it’s hot.

Regular consumption of fresh juices and homemade beverages like this one do benefit our overall health. Here are a few more such recipes for you to explore: a soothing syrup with spices, raisin kalkand syrup and turmeric tea. Remember to choose the right one for the season, and for your current tastes or needs!

For the longest time, from when I was a child, I’ve been eating semiya upma as a breakfast dish. Our mother prepared it often when we were growing up. Back then, cereals and so on were not readily available (at best, some cornflakes would show up at the grocery store, but they were a rarity, as were items such as baked beans). We would make a big fuss about wanting bread, buns or what to us were more interesting fare, but the fact is that our mother made us a hot, fresh breakfast every morning – and we were all the luckier for it. Things have really reversed now, and I understand that such thoughtfully prepared breakfasts are simple luxuries. I find myself doing the same now, giving my family the same benefits of a home-cooked meal.

After eating copious amounts of sugar for Diwali, this makes for a healthy and comforting breakfast. Many people feel like they really don’t want to reach out for sweets at this time, and are almost sick of them, so nutritious foods like a good semiya upma are ideal.

Upma is a South Indian dish that is usually made with any grain: poha, rava, broken wheat, millet and so on. Semiya is a kind of roasted vermicelli, and this is what my mother and now I mostly use to prepare upma.

My mom’s upma contained onions, as is usually the case, and I take the vegetable quotient further by adding carrots and beans. As children, we would often ask for a sprinkling of sugar over the dish, which she gladly agreed to in order to get us to consume it. She would occasionally take this to the next level and prepare a sweet upma with sugar and ghee too. I have yet to try this dessert version, but regularly have a variety of savoury upmas at home. We enjoy exploring an assortment of dishes, but upmas and pohas appear on our table at least once a week each.

Upma cooks very quickly, so aside from being a good breakfast it’s also perfect when you have a guest over suddenly during the day and need to whip up a meal fast. As far as breakfasts go, I have made various attempts at intermittent fasting but this semiya upma is the thing that gets in the way. It is just too dear to me and I don’t want to miss it, so I guess you could say it’s a cheat day special!


Semiya Upma

(Serves 2-3)


2 tablespoons oil

½ teaspoon mustard seeds and cumin seeds

1 cup carrots and beans (finely chopped)

½ cup onions (finely chopped)

1 cup semiya

1 green chilli

Salt to taste

3-5 curry leaves

3 cups water

1 lime


Heat a kadai. Add the oil. Once it has heated, add the mustard and cumin seeds. Allow to splutter, and then add green chilli and curry leaves.

Next, add the onions and sauté for a minute. Now add the vegetables. Cover and allow to become tender on a low flame.

Next, add the water and salt. Increase the flame and once the water boils over, add the roasted semiya.

Mix gently. Cover and allow to cook on a low flame until the water evaporates and the semiya is tender to the touch.

Finally, squeeze the lime juice in and mix gently. Garnish with coriander leaves.

Your semiya upma is now ready to be served. It can be eaten plain, or with some coconut chutney on the side.

While I’ve shared a traditional Indian favourite this time, breakfast does come every day and you may want to explore the varied recipes I’ve shared before from different cuisines. They will all give you a happy start to the day!


Milk plays a very central role in most communities in India. This is evident when it comes to cuisine, where dairy ingredients like ghee, paneer (known as cottage cheese in the West) and milk itself are crucial components of many dishes. Milk also has religious significance, such as in Hinduism wherein idols of deities are bathed in milk and then offered specially-prepared sweets which often contain the same. In South India, where I live, other than Deepavali or Diwali the big festival is Pongal, when milk is boiled and allowed to spill over the pot as a sign of abundance, a good harvest and new beginnings. Milk therefore can be considered auspicious or even sacred. With Diwali just days away, a milk sweet is thus a must on this blog. This year, I have chosen to share with you the recipe for rabdi. Rabdi is essentially a form of thickened milk, not to be confused with condensed milk.

In the past, I have mentioned various kinds of kheers on this blog, including orange kheer, sitaphal kheer and rose-coconut kheer. Rabdi is a similar dish, and you may also hear it being called by the name rabri. It is also difficult to differentiate between rabdi and basundi. There is a vast array of milk-based desserts in the subcontinent, and sometimes they may resemble each other in look, preparation or taste.

As you may know, over the last few years I’ve increasingly taken a vegan approach to my diet, and many recipes I’ve shared here attest to the same. Being vegan in India is certainly a bit of a challenge because dairy is a big part of our cuisine, as mentioned before. We also have certain conditioned ideas about the importance of it, such as how children are forced to drink milk as it is believed to give them good health and strength, or even how drinking chai is a kind of milestone. I remember how when I first got married and started drinking chai, I started to feel like “Now, I am an adult”. All this aside, my personal struggle is not with milk, ghee, paneer or milk sweets at all but with yoghurt. I just can’t seem to give that up. Anyhow, more on that later, as I continue on my adventures on the vegan path.

For now, since I still consume dairy, I’m going to do so by reflecting on what it means on a day like Diwali, when it is such a big part of our food and our rituals.

Actually, it is important in my family on more than just a festive occasion such as Diwali, but every day. You see, I grew up with a precious statue of Balagopal, the baby version of Lord Krishna. This statue has been in my family for generations. He was gifted to my great-grandmother by a priest, then looked after by my grandfather, then my parents, and now my 91-year old father. My father has found it difficult to keep up with the seva, or rituals, and I imagine that I will welcome Balagopal in my own home in due time.

We have elaborate customs to worship him, which must be performed throughout the day. He must be treated like a child of the home: he must be bathed, fed, dressed, sung to, played with, and put to bed – until the following morning, when it must all be done all over again. There are seasonal rituals too. In summer, he is given water in a tiny pot and cooled with a tiny khus khus (vetiver) fan. In winters, he is dressed in warming velvet and fragranced with attar.

To me, these rituals are an exemplary way to follow traditions that inculcate discipline, respect, humility and generosity, as well as a daily practice of celebration and joy. I am sure that when he does come to my home, his welcome will be a very big affair. I am waiting to receive him. I have taken the advice of elders in the family who tell me that I should do the best seva I can, but that I cannot miss a day. He can never be abandoned or ignored, just like my child.

I am a big believer in “to each their own”. People look at or don’t look at God, do or don’t have spiritual leanings, and come from different religions with their own systems. They are all valid to me. For myself, I see Balagopal as an important legacy, one I want to continue for the sake of both of my elders and my children.

Now, the sweetest part of all this: Balagopal loves milk, according to the myths. So he is often offered a milk-based treat, such as rabdi. So it is sure to be among my offerings to him. It can also be among your own festive delights. Both these thoughts give me joy.

Rabdi

(Serves: 4)


2 litres milk

1 cup sugar

¼ teaspoon saffron strands

¼ teaspoon cardamom powder


In a heavy-bottomed pot, boil the milk on a low flame. Keep stirring to make sure it does not stick at the bottom of the pot. Do this until the milk has reduced to almost half the quantity. This will take about an hour.

When the milk is noticeably thick, add the sugar and saffron. Continue to stir constantly. Finally, add the cardamom powder. Stir and take the pot off the flame.

Cover with a lid and allow to cool until it has reached room temperature. Then, refrigerate.

Rabdi can be eaten either cold or warm, and I hope it will bring some sweetness to your festivities this year. In many communities, these go on for about a week, with something special eaten every day. If you’re looking for more recipes to make your Diwali delicious, do explore my blog archives. Let me point you toward the recipes for laapsi, chevdo and sweet ghugras to begin with. Enjoy!

The re:store kitchen has been abuzz with orders this festive season and amidst all the delight of preparing your favourites for you, I’ve been taking some time to make some goodies for my family too. Among these is namakpara, a snack that is a type of Indian biscuit. The sweet version is called shakarpara (“shakar” means “jaggery” and “namak” means “salt”). I thought I would share the savoury version with you as it deliciously counterbalances the taste of the many desserts that you’ll no doubt also be enjoying during this indulgent month!

My absolute fondest memories from childhood have to do with the big festival of Diwali. All of us kids looked forward to it, not only for the special treats and new clothes but also because there was such a cheerful atmosphere around us. For me, the essential memory is all about fragrance: of waking up in the days preceding Diwali and on the day itself to the tantalising smell of the yummy savouries and sweets being fried at home.

Our mother would be busy making them early in the mornings, and the culinary preparations would happen over the course of several sessions. As I have mentioned in earlier festive posts, she and a few friends of hers would get together and cook communally. They would help each other out, making enough for everyone’s families and sharing recipes and techniques. There was a great sense of camaraderie in our homes, as well as mouth-watering anticipation among us kids. Of course, our mother would keep everything she fried in tins up on a high shelf out of our reach!

Each day, we looked forward to her giving us our share of those goodies. It would be a small portion every day. We relished the whole experience so much.

These days there’s such abundance and such accessibility – just make a call, open an app, pay online, have it home-delivered. That didn’t happen back in those days. Everyone had to make their treats on their own. Even gifting consisted of homemade goodies. We would send something made in our kitchen, and they would send something made in theirs. It was all unlike festive celebrations of today, when we can take things for granted.

There was a simplicity to our lives, and I miss it. I don’t know if it’s possible today, but I want my children to experience it too. So I do the next best thing: I continue to make the sweets and savouries I learned to make from my mom. And we observe a rule at home that no matter where they are in the world or how busy they are in their own lives, all of my kids must come home for certain occasions. Diwali, naturally, is one of them. I really believe that we must take a pause sometimes and understand the importance of family, and make time for friends who are like family. This is a great time to do that.

I hope this namakpara will be relished at your gatherings this Diwali too. If you’re looking for more recipes that are perfect for the festive season, I hope you’ll explore my blog archives. There are six years’ worth of wonderful sweets and savouries here, as well as a host of other dishes – from nutritious to decadent. Here’s to many more to come! Thank you for being with me on this journey.

Namakpara


1 cup maida

2 tablespoon ghee

1 teaspoon rawa

Salt to taste

¼ teaspoon turmeric

1 teaspoon ginger green chili paste

1 teaspoon kasuri methi powder (or fresh fenugreek leaves)

Water as required

Oil for deep frying


In a bowl, add the maida, ghee, rawa, kasuri methi powder (or fresh fenugreek leaves, if you have access to them), turmeric and ginger chili paste, along with salt to taste. Mix with your fingertips.

Add water as required, using a tablespoon so that it’s not over saturated. It needs to be sufficient to make a tight dough.

Mix well. Grease your palms and knead the dough until it is smooth.

Now, roll out the dough. Using a knife, cut it into diamond shapes or any shape you desire. The number of pieces in the yield quantity will depend on the size you choose (I have made mine small, as they look pretty). Meanwhile, heat the oil.

Deep fry the cut namakpara on a slow flame, occasionally turning up the heat for a few seconds or so. Fry until golden brown. Drain onto a paper. Once cooled, store in an airtight tin.

You may have noticed the unusual green tinge of this snack in the photographs. That shade comes from the use of fenugreek (methi). I like to add fresh leaves. They are supposed to be in season now, but the rain has made the supply irregular where I live. So what I do is dry the leaves when I can get them, then powder and use them. You can also purchase this powder, known as kasuri methi.

It will also add a slight hint of bitterness to the flavour of the namakpara, which I personally like as it balances the intense sweetness of festive desserts that may be consumed at the same time. I also sprinkle my fenugreek powder into dough, batter, salads and more, so that I can incorporate its benefits into more meals. I’m a fan, but you can skip it altogether if you prefer.

Isn’t it funny how fenugreek is in season right now – during a time of indulgent feasting? Balance is clearly one of the laws of nature. It’s a good law to observe when it comes to food too.

Enjoy this with anything else sweet, savoury or festive – or just make it as a teatime snack at another time of year, to add some pep to an ordinary day.

Tell me: what are you preparing for the festive season this year? As always, I love hearing from you!

I recently visited my very dear friend Girija, whom I’ve talked about before. Her stew is famous. I hope you’ve experienced why; I shared the recipe a while ago so that its delightfulness could spread even further. Whenever I visit her, it feels like I’m going home. She spoils me, looks after me, cooks everything that I like to eat, and I have to admit that she is a way better cook than I ever can be.

In my previous recipe, for beetroot cutlets, I mentioned that the dish had been popping up in various conversations around the same time. Girija was one of the people I discussed the dish with, and I recall telling her that what I usually make is a mixed vegetable cutlet. I enjoy talking to Girija about culinary innovations because there is a lot I learn from her. Through her, I know about cooking meat dishes that I wouldn’t otherwise have a familiarity with, along with details like spice usages and the reasons behind them. I often say that my mother was my first teacher in the kitchen, and that subsequently studying Macrobiotics at the Kushi Institute enhanced my outlook and the way I see and treat food. I feel Girija is among these teachers of mine too.

I share all this with gratitude, which is connected of course to the Indian belief that food must be treated with respect and should never be wasted, and to the practice of saying grace before meals in some cultures. As I share my mixed vegetable cutlet today, during this festive month and incidentally the month in which this blog of mine turns six years old, I want to say that am so happy to have such lovely people in my life. Between you and me, I am even grateful to have the not so lovely ones as well, for they teach us too. Life is all about learning and growing. Over the last few years, I’ve learned and grown so much in the culinary field and beyond. It all begins with the food we cook, the food we eat, and the food we learn to cook – together.


Mixed Veg Cutlet

(Yield: 6 pieces)


2 cups finely chopped vegetables (beans, carrots, peas)

1 boiled potato

1 slice of bread made into bread crumbs

1 teaspoon oil + oil for shallow frying

Salt to taste

1 teaspoon aamchur (raw mango powder)

1 teaspoon garam masala


In a kadai, add the 1 teaspoon of oil. Once it has heated, add the vegetables. Stir and allow to cook until tender.

Transfer the vegetables onto a shallow dish and add the potato, bread crumbs, salt, aamchur and garam masala. Mash all the ingredients together well until combined. Add the coriander leaves.

Make the mixture into palm sized discs. Set aside.

In a flat pan, add some oil. Once it has heated, gently place the cutlets onto the hot oil. Lower the flame to low-medium. Allow the cutlets to turn golden and then flip. Allow to cook on both sides.

Your mixed veg cutlets are now ready to serve. I hope you’ll try them out, and that you’ll also explore my beetroot cutlet, sweet potato tikki and harra bhara kebab recipes, which are in a similar vein. All go well with an assortment of dips, chutneys and sauces. Let me know what you think, and if there are any other cutlet recipes you’d like me to try out and share with you in future. As I said earlier – we just keep learning, and for me I find that sharing is a way of learning too.


Staying fit and staying healthy have always been important to me, and these are my mantras when it comes to cooking and eating. Especially today, when the importance of being very careful about what we put into our mouths has become widely understood. It all affects our bodies, and our health should always be our top priority. I have many friends who are still recovering from long COVID. It’s not that they were unhealthy to begin with, but this crisis has made us all more conscious about taking steps to boost our immune system. In my case, this has meant choosing to consume less sugar, while consuming more fibre and more protein.

Any dietary website you consult, whether you agree with it or not, will tell you that overdoing anything is the big risk. It is only vegetables that are exempt from this rule, which is why I put as much of them as I can into my cooking. Specifically, for today’s recipe, into my cutlets. I’ll share another variety soon, but to begin with, here are beetroot cutlets, also known as beetroot tikkis.

A tikki is essentially a sort of Indian cutlet. If you make these in a smaller size, they become great starters when accompanied with a green chutney, which always peps things up. In order to make it more filling, some paneer, potato or spinach are great additions. I have used paneer and potato in this version.

There are various ways to prepare the beetroot. You could grate the raw beet, then cook it or deep fry it. Or you could boil or steam it instead. Either way, it’s really delicious. Beets contain a lot of natural sugars, which help fulfil your body’s sugar cravings. This vegetable is also rich in fibre, potassium, folate, manganese and iron.

The idea of making beetroot tikkis came about because the concept kept popping up in different conversations. A few different friends I’d been visiting all talked about it. This was what inspired me to try out and share a recipe for myself. You know how it is sometimes – something keeps coming up repeatedly in one’s life, and once you notice the pattern you are almost compelled to explore it. Whether it’s something small, literally, like a cutlet, or something bigger – a question, a person, a place… There’s always some learning there, if we choose to find it. In this case, adding this recipe into my repertoire has been an enjoyable little learning indeed.

Beetroot Tikki

(Yield: 6 pieces)


1 cup raw grated beetroot

½ cup grated paneer

Salt to taste

½ teaspoon garam masala

½ teaspoon aamchur (mango powder)

½ teaspoon roasted cumin powder

1 teaspoon ginger-green chili paste

1 boiled potato

2 tablespoons bread crumbs

2-4 tablespoons oil for shallow frying

1 tablespoon extra bread crumbs for shallow frying


In a pan, sauté the grated beetroot on a medium to high flame until the water is cooked. Boil and mash the potato.

In a bowl, add sautéed beetroot, boiled and mashed potato, paneer and spices. Add the crumbs too.

Mix these ingredients together well with your hands and shape them into tikkis.

On a flat pan, add sufficient oil. Dip the cutlets into the extra bread crumbs and then place them on the pan. Allow to cook until golden, then flip over to the other side.

Your beetroot cutlets / tikkis are now ready to serve. They are usually eaten as a snack, with any dip of your choice. If you’re a fan of dishes like these, my sweet potato tikki and harra bhara kebab recipes may be fun to try out too. I have another cutlet recipe coming up soon on my blog. Stay tuned, and as always, I love hearing from you!